


In this documentation entry we are going to show you how to establish a connection between your desktop and a VPN server using the L2TP protocol. This process is really straightforward and you do not need to download any additional clients or management software as we will be using your operating system’s readily-available VPN options.
This accessibility feature makes this particular protocol easy to set up and operate, which is exactly why it is also quite welcoming towards newcomers, who do not have any prior experience in relation to operating or managing a VPN so let’s dive right into it!
Connecting your Windows desktop
If your PC/laptop is running on Windows, then just follow these basic steps.
Go to the search menu located in your taskbar and type ‘Settings’.

Next, click on the settings icon that appears as a search result or simply tap the ‘Enter’ key on your keyboard.
Following that, a window containing all of your system’s settings will open. In the search field, located at the top, type in ‘VPN’ like it’s illustrated in the image below.

A dropdown option menu will open. From here select ‘VPN settings’.
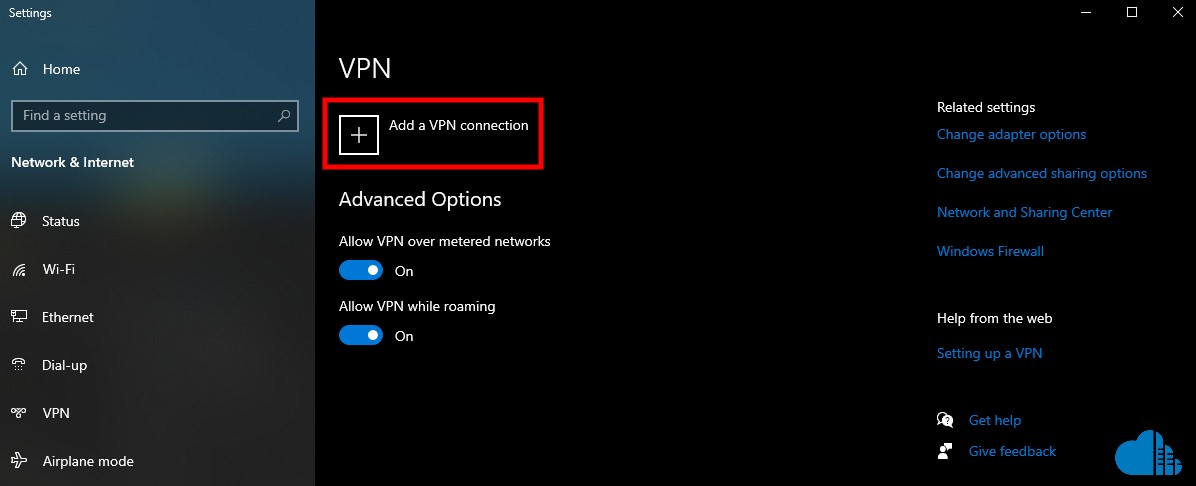
You will then arrive at the settings page for your Windows-based PC or laptop. Select the ‘Add a VPN connection’ button as highlighted below.
A configuration menu will appear. First, from the dropdown menu under ‘VPN Provider’, select ‘Windows (built-in)’.

The next important step is to navigate down to the ‘VPN type’ field and select ‘L2TP/IPsec with pre-shared key’ from the menu.

Now, proceed to fill in all of the other empty fields to finish the setup process. All of the necessary information should be provided to you via your VPN provider, meaning that you have to transfer the information into its corresponding fields. Remember that ‘Server name or address’ is the IP address provided in the email as ‘Host’.
The only field that you need to fill in by yourself is ‘Connection name’ and it involves just naming your device’s link to the server.

Select ‘Save’ and you’re done! You will be securely connected. In order to connect, click on the ‘Connect’ button and you are all good to go.

Connecting to the VPN using a MacOS desktop
To connect to the L2TP server, you will also utilize the system's built-in VPN similarly to the Windows process. Simply navigate to ‘System Preferences’ or ‘System Settings’ and search for the ‘Network’ icon. If you are not able to locate it, you can also type ‘Network’ in your search bar on the top right of the screen.

Clicking on the icon will get you to your system’s network settings, which should look like so:

From here you need to use the ‘+’ icon at the bottom left, highlighted with red in this image:

This will generate a new window, allowing you to choose the type that you wish to add. From the ‘Interface’ dropdown menu, select ‘VPN’.

After that a new menu will pop up underneath the selection that you made. From it, choose ‘L2TP over IPSec’. Following that, you will also need to name your connection. There is no specific name you should use, so name it however you like. Once finished, choose ‘Create’.

This will bring up a service configuration window, which you will have to complete with the information that will have been sent to you by your provider.
- Leave the ‘Configuration’ setting on ‘Default’.
- ‘Server Address’ - input your server’s IP address (should be provided to you).
- ‘Account Name’ - input your username (will also be provided to you).

Next, select ‘Authentication Settings…’ as highlighted here:

This will open up a user authentication window. Input your password into the corresponding field. As for the ‘Shared Secret’, copy and paste the long sequence of characters, numbers and symbols, which should be labelled as ‘PSK’ or ‘Preshared Key’.

After you have finished filing in the required information, select ‘OK’. Select the ‘Advanced…’ button as seen in the following image:

Under ‘Session Options’, tick the ‘Send all traffic over VPN connection’ box and choose ‘OK’.

Finally, click on the ‘Apply’ button.

All that’s left to do now is to navigate to the ‘Connect’ button.

To make sure that your connection has been established check your network status field, located on the left side of the window. It should turn green with a ‘connected’ label appearing underneath. Your ‘Status’ should also state ‘Connected’ and your new ‘IP Address’ will also be visible to you.

As a side note, if you would like to stop the service, you can terminate it by using the ‘Disconnect’ button.
If you need to connect more devices, you can also visit our tutorial on how to create additional user profiles for your L2TP server. Additionally, we also have an entry in our documentation that you can check out if you want to connect your mobile device to your L2TP server.
Further security checks
To ensure that your connection is active and secure you can try searching for ‘What is my IP’ in your Web browser of choice. If your IP appears different when connected to the VPN server in comparison to when you are not, then everything is in working order.

