NewExtra server protection with Measured Boot & UKI images.View Measured Boot
BlogDocumentationFAQNo Third-Party CookiesContact Us
  • Pricing
Log inSign up
Cloud VPSVDSMemory-Optimized VDSStorage-Optimized VDSWindows VPSBitcoin VPSDDoS ProtectionPrivate Networking (VPC)Floating IPsAdditional Server SupportMicrosoft LicensesDatacenterNetworkDocumentationFAQNo Third-Party CookiesConfidential ComputingSelf-Hosted VPNBlogAboutBrand GuidelinesAffiliatesContact UsLegal & Compliance

Products

  • Pricing
  • Cloud VPS
  • VDS
  • RAM-Optimized VDS
  • Storage-Optimized VDS
  • Windows VPS
  • Bitcoin VPS
  • DDoS Protection
  • Private Networking (VPC)
  • Floating IPs
  • Microsoft Licenses
  • Additional Server Support

Explore

  • Documentation
  • Developers API Docs
  • FAQ
  • Datacenter
  • Network
  • Looking Glass
  • Confidential Computing
  • Cookie Policy
  • Self-Hosted VPN

Company

  • Blog
  • Contact Us
  • About Us
  • Brand Guidelines
  • Affiliates

Legal & Compliance

  • Terms of Service
  • Privacy Policy
  • Data Processing Agreement
  • Acceptable Use Policy
  • Microsoft Software Terms of Use
  • Refund Policy
  • Report Abuse

Products

  • Cloud VPS
  • VDS
  • RAM-Optimized VDS
  • Storage-Optimized VDS
  • Windows VPS
  • Bitcoin VPS
  • DDoS Protection
  • Private Networking (VPC)
  • Floating IPs
  • Microsoft Licenses
  • Additional Server Support
Pricing

Explore

  • Documentation
  • Developers API Docs
  • FAQ
  • Datacenter
  • Network
  • Looking Glass
  • Confidential Computing
  • Cookie Policy
  • Self-Hosted VPN

Company

  • Blog
  • Contact Us
  • About Us
  • Brand Guidelines
  • Affiliates

Legal & Compliance

  • Terms of Service
  • Privacy Policy
  • Data Processing Agreement
  • Acceptable Use Policy
  • Microsoft Software Terms of Use
  • Refund Policy
  • Report Abuse

© VPS.BG Ltd. 2026 · All rights reserved!

Made with passion in Bulgaria · VAT ID: BG203144520

Contents

  • How to get a server with a custom ISO
  • How to upload a custom ISO to my server

Subscribe to Our Newsletter

Join 5000+ subscribers and receive helpful content, deals and more! We promise no spam - 100% great content. Unsubscribe anytime.

Share Article

#Tutorial
  1. Documentation
  2. /
  3. #Tutorial
  4. /
  5. How to install a custom ISO on your cloud server

How to install a custom ISO on your cloud server

Published: 03 February 2020 • Updated: 13 February 2026 • 3 min read

#Tutorial#Custom ISO

Getting your own custom ISO up and running on our servers is quite simple. You can set up a custom ISO directly during the configuration stage of your server or you can also do so from the “Settings” tab from your server management page.

For the sake of this tutorial, we are going to be showing the steps using the configurator, but they are exactly the same if you were to upload your custom ISO from your server’s management page.

How to get a server with a custom ISO

Start by logging into our Console and clicking on the “Order new service” button. From the dropdown select “New server”.
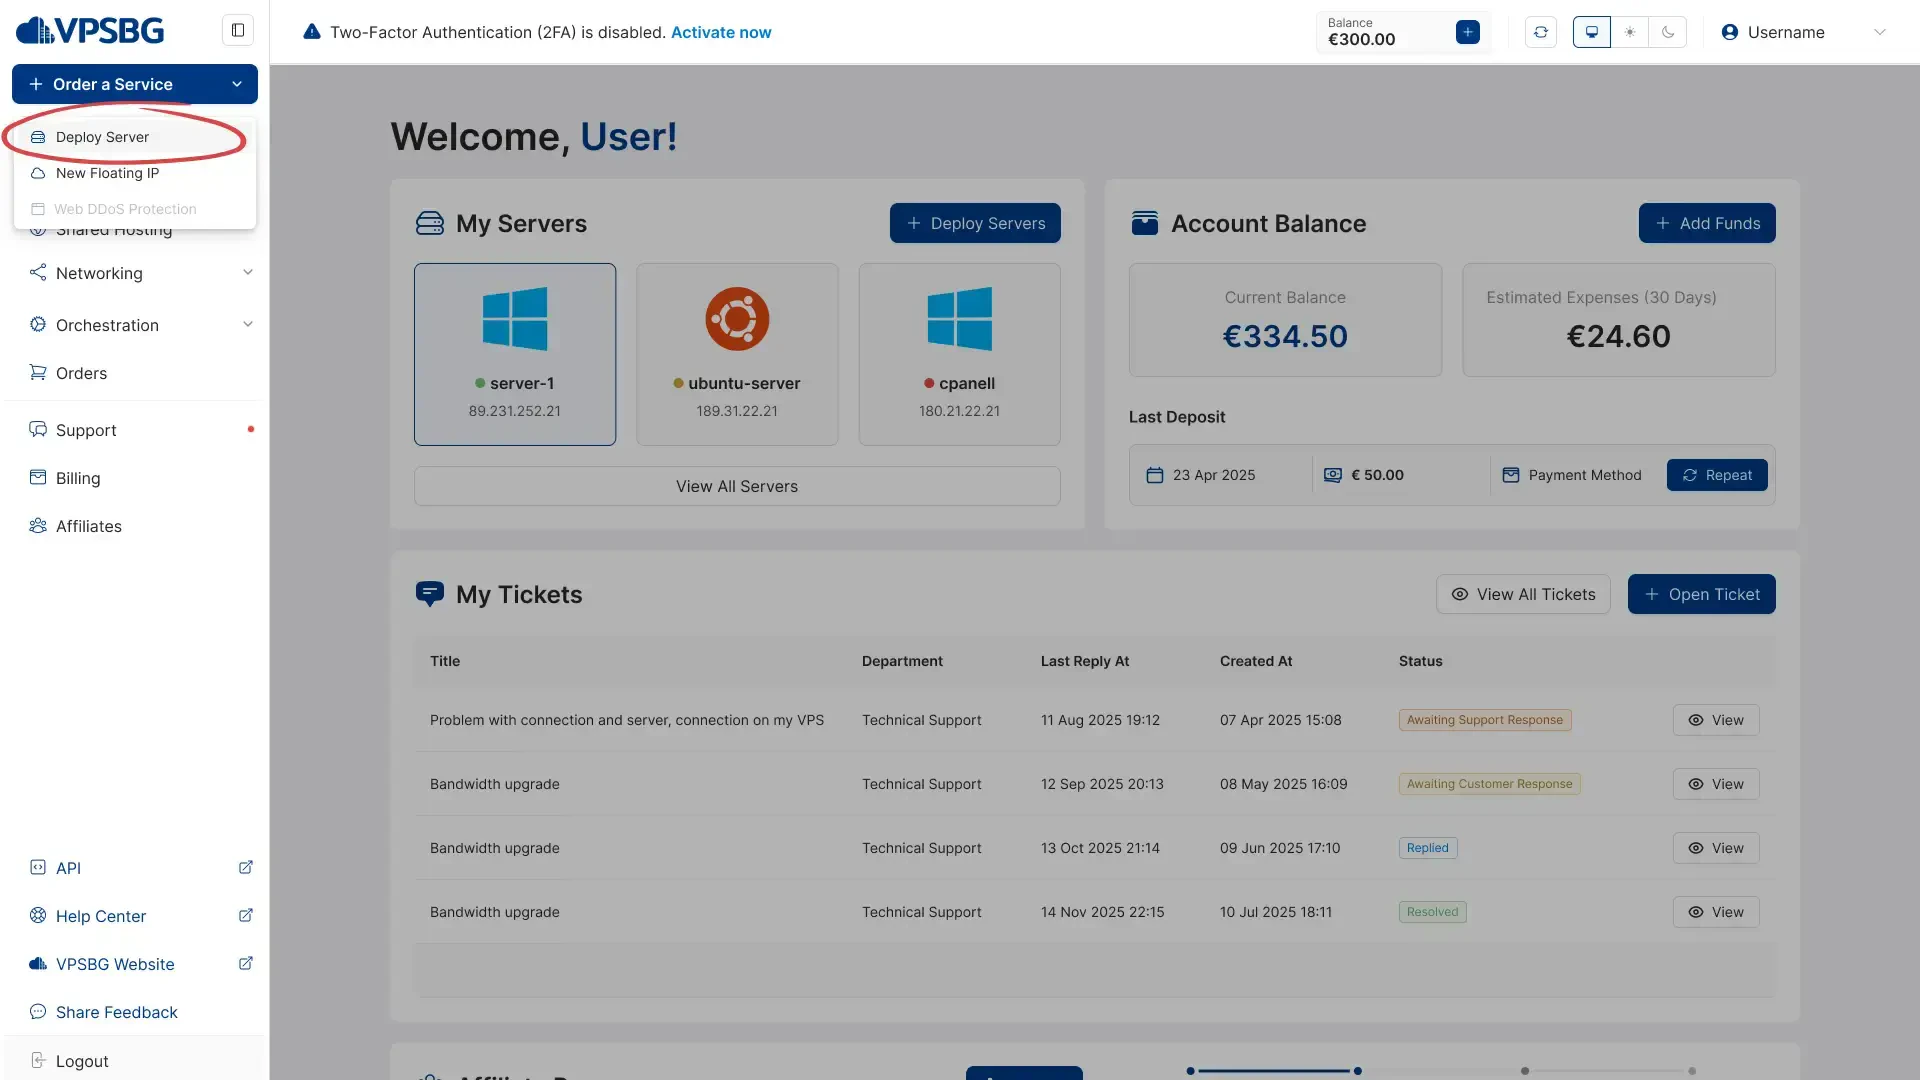
configurator

You will now arrive at the configurator. From here, select your hosting plan, billing parameters and extra features and then look at the 'Server Image' section. Next, select the “Custom ISO” tab from the options.
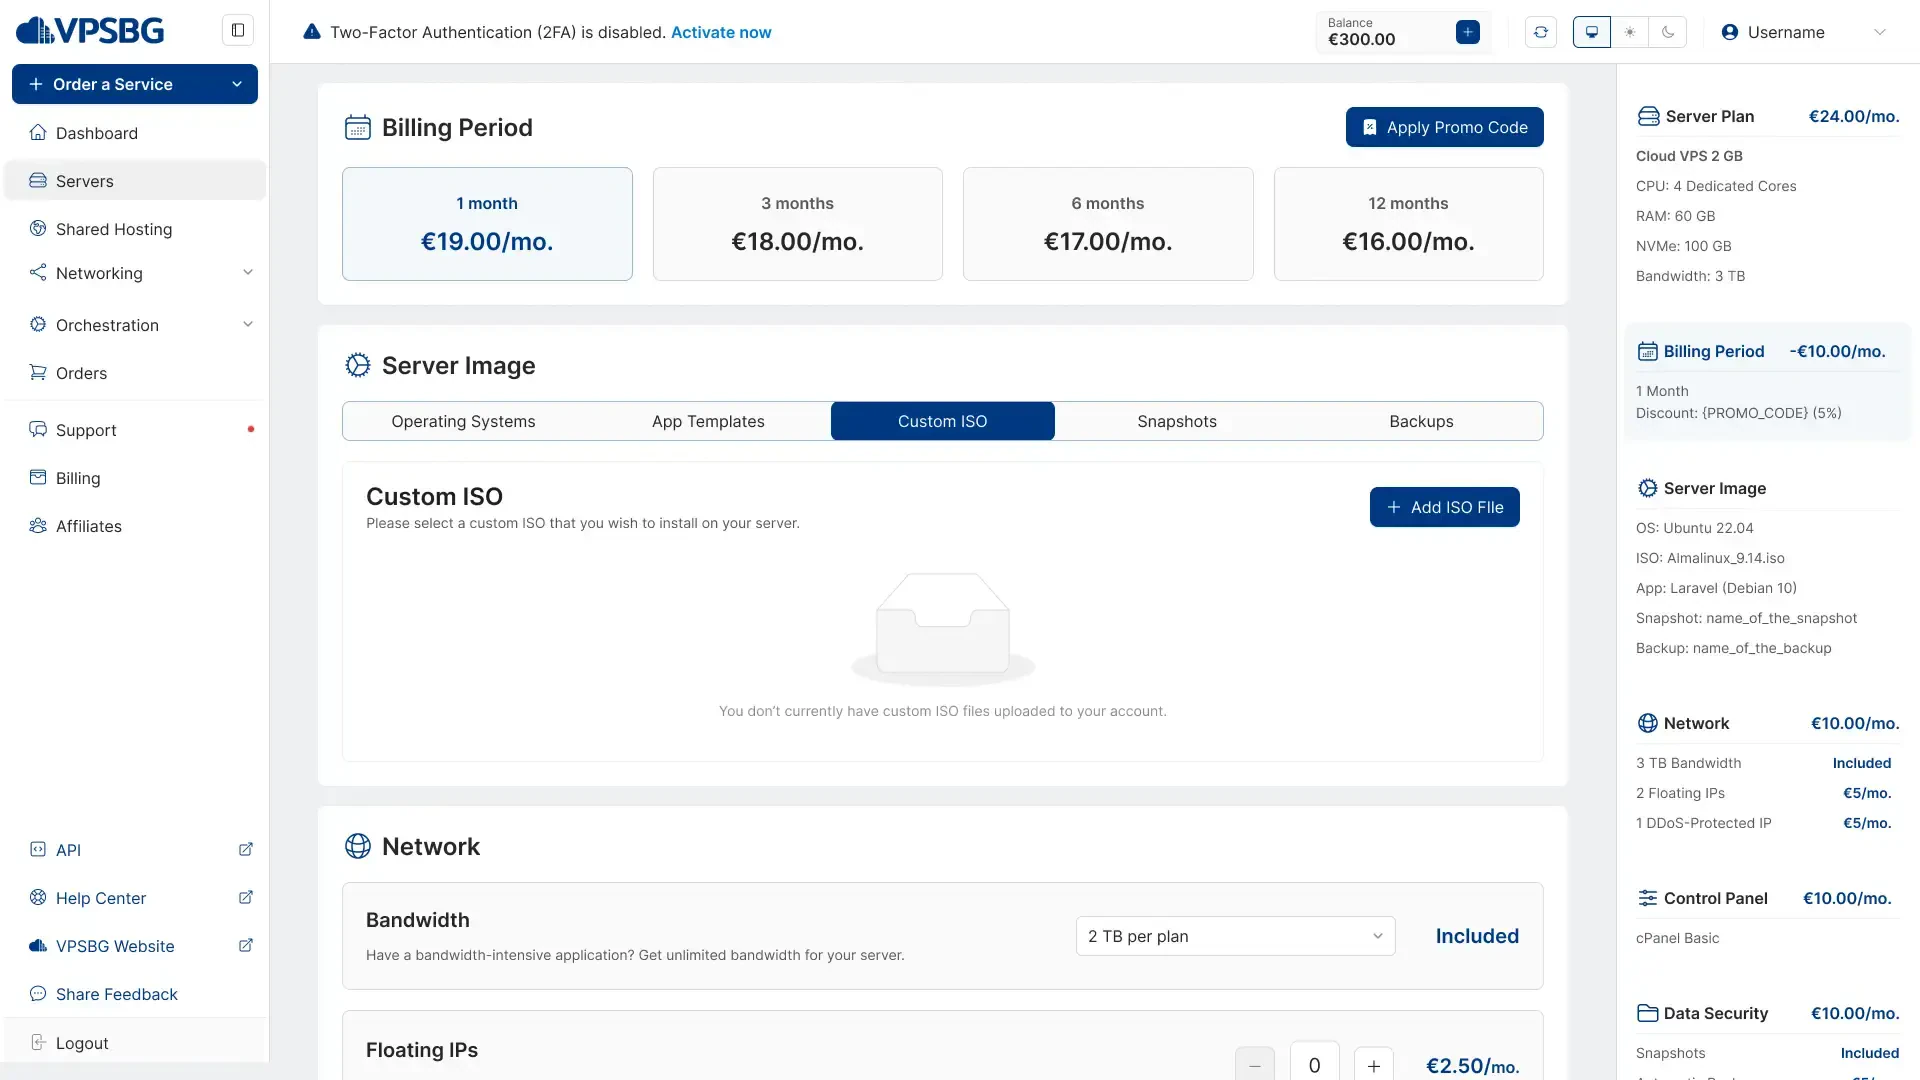
custom iso tab

Once here, click on the “Add ISO File” button.
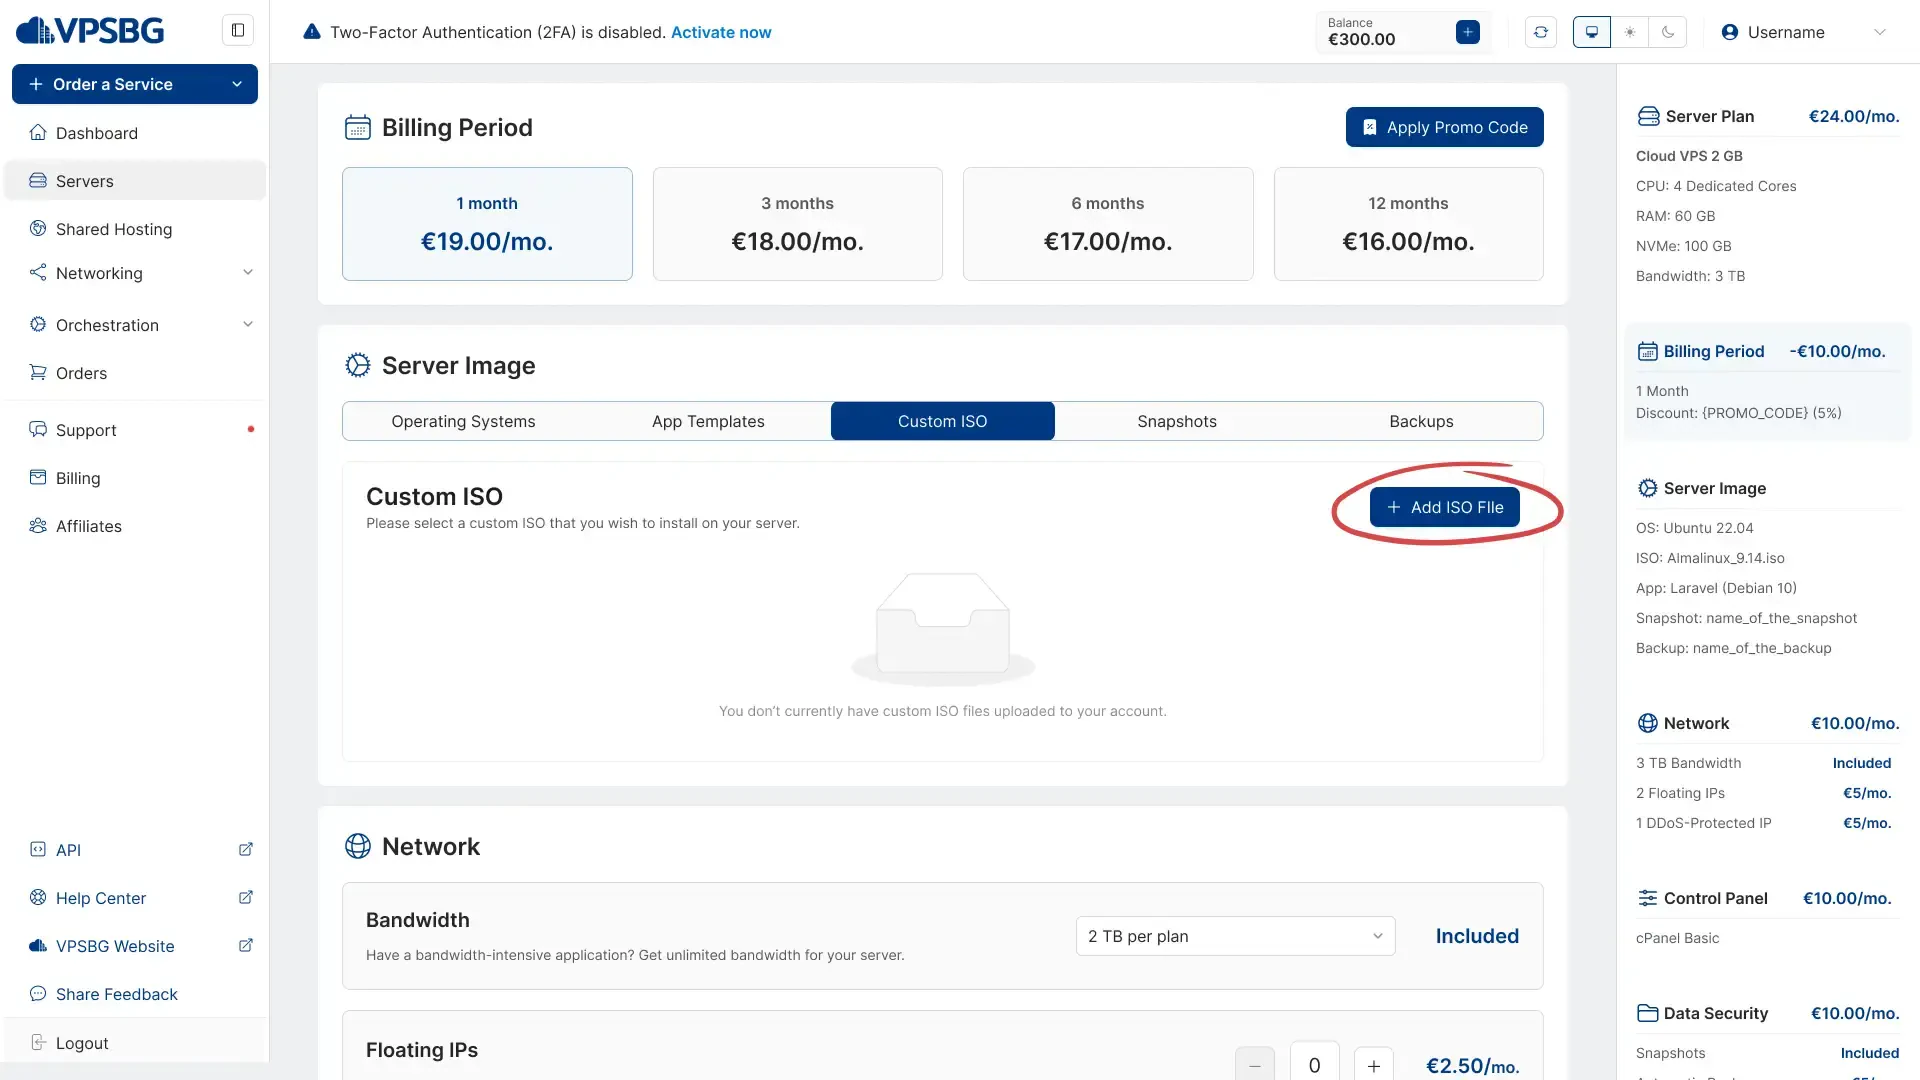
upload custom iso

This will bring up the following screen, which will prompt you to input a download link for your custom ISO. Simply paste your link, click on the 'Download' button and our system will automatically begin to download your ISO.
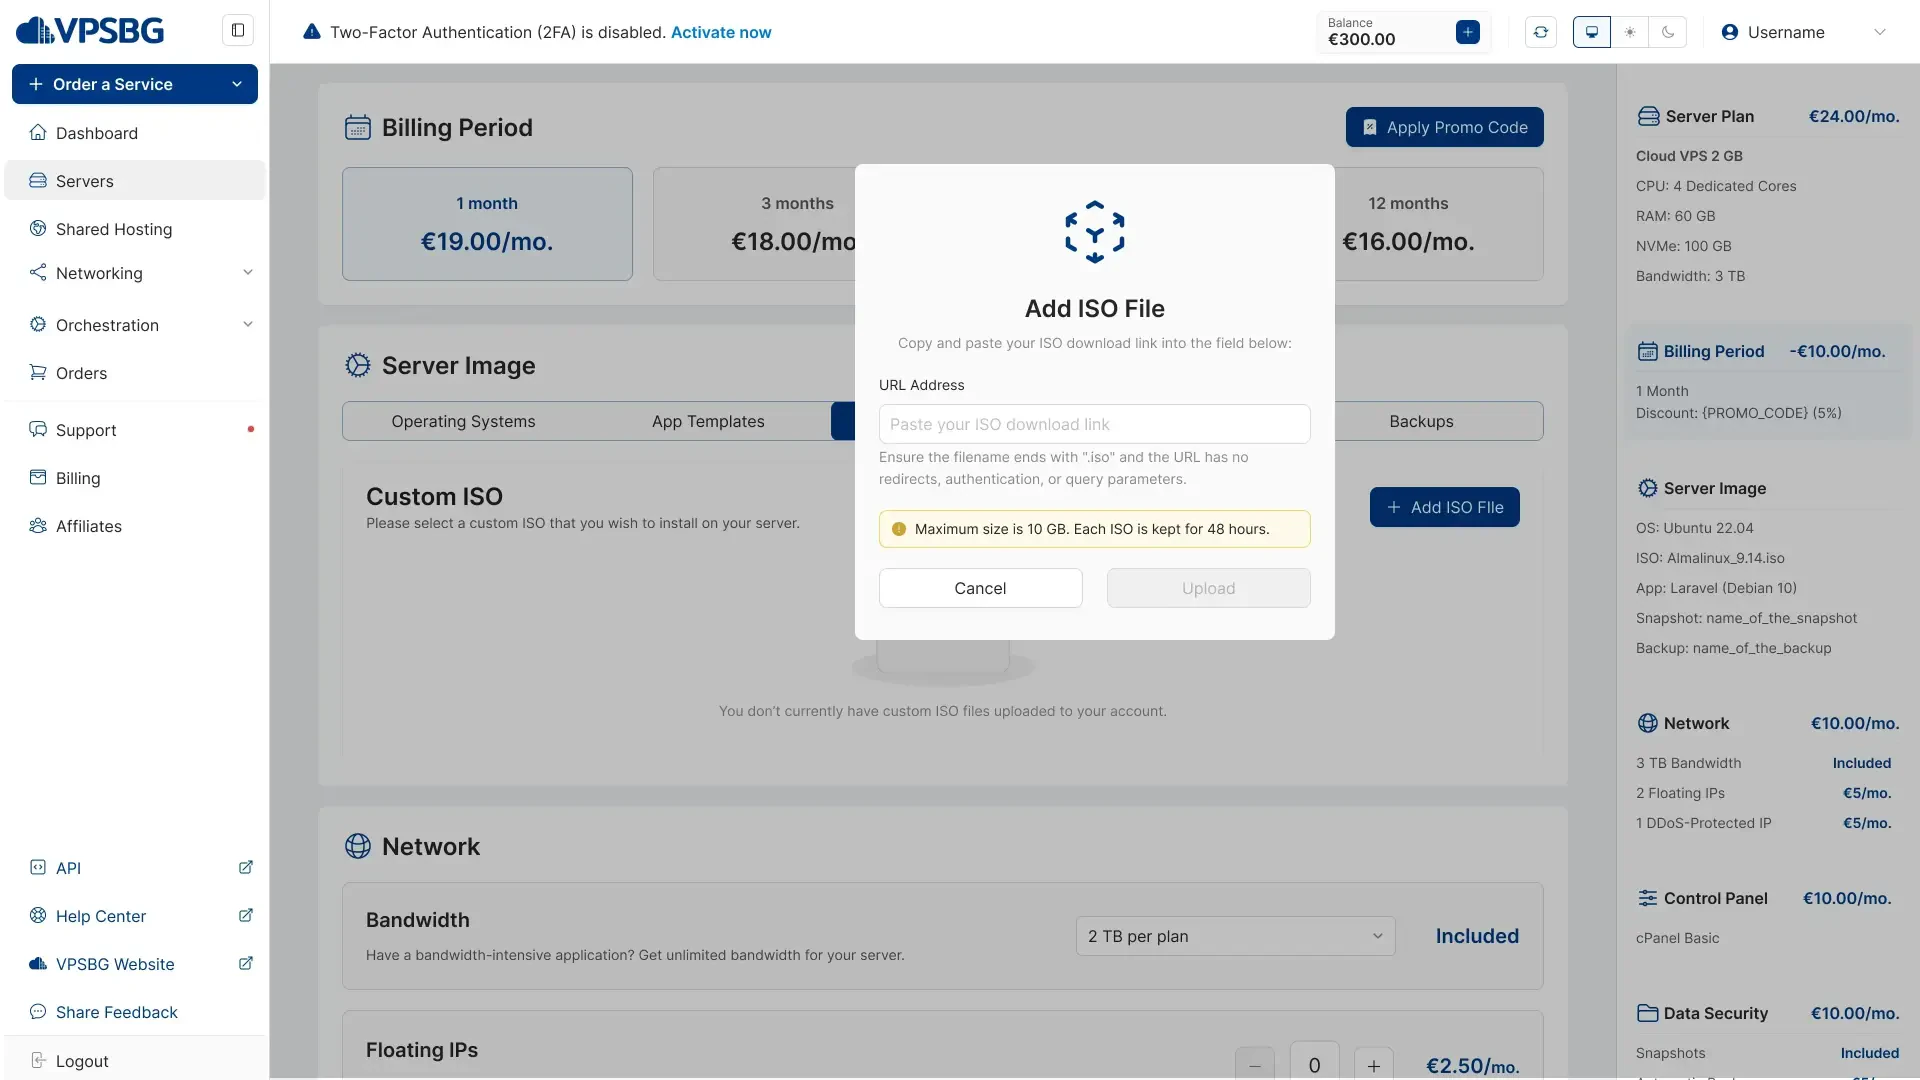
add iso file

IMPORTANT: You can upload a maximum of 2 custom ISO files. Each custom ISO you upload has a max size limit of 2GB and is only kept for 2 days if not utilized.

You will be able to see the download progress via the progress bar. Once the download finishes, you will have the option to mount your ISO or to simply leave it for now. You can also delete your ISO using the delete button.
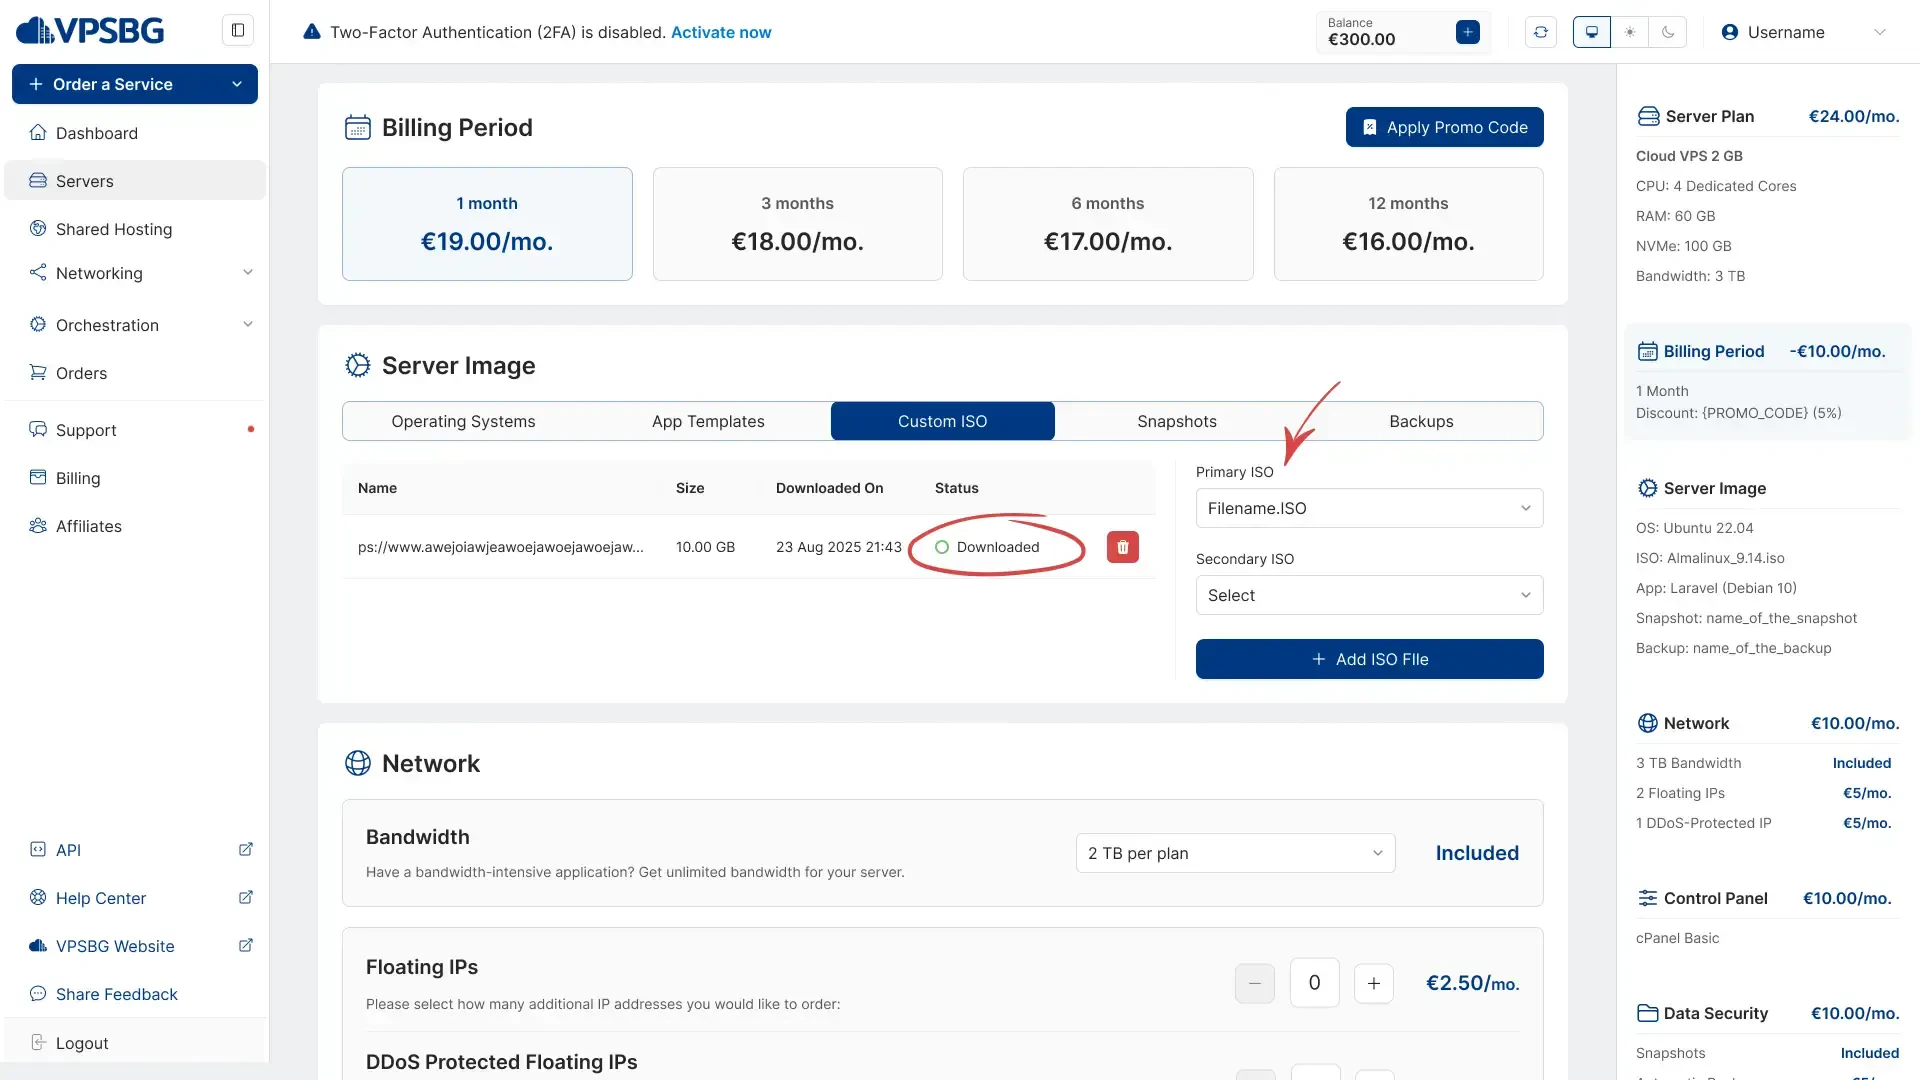
delete iso button

If you upload multiple ISO files, you will have the option to mount one of them as a Primary ISO and the other as a Secondary ISO.
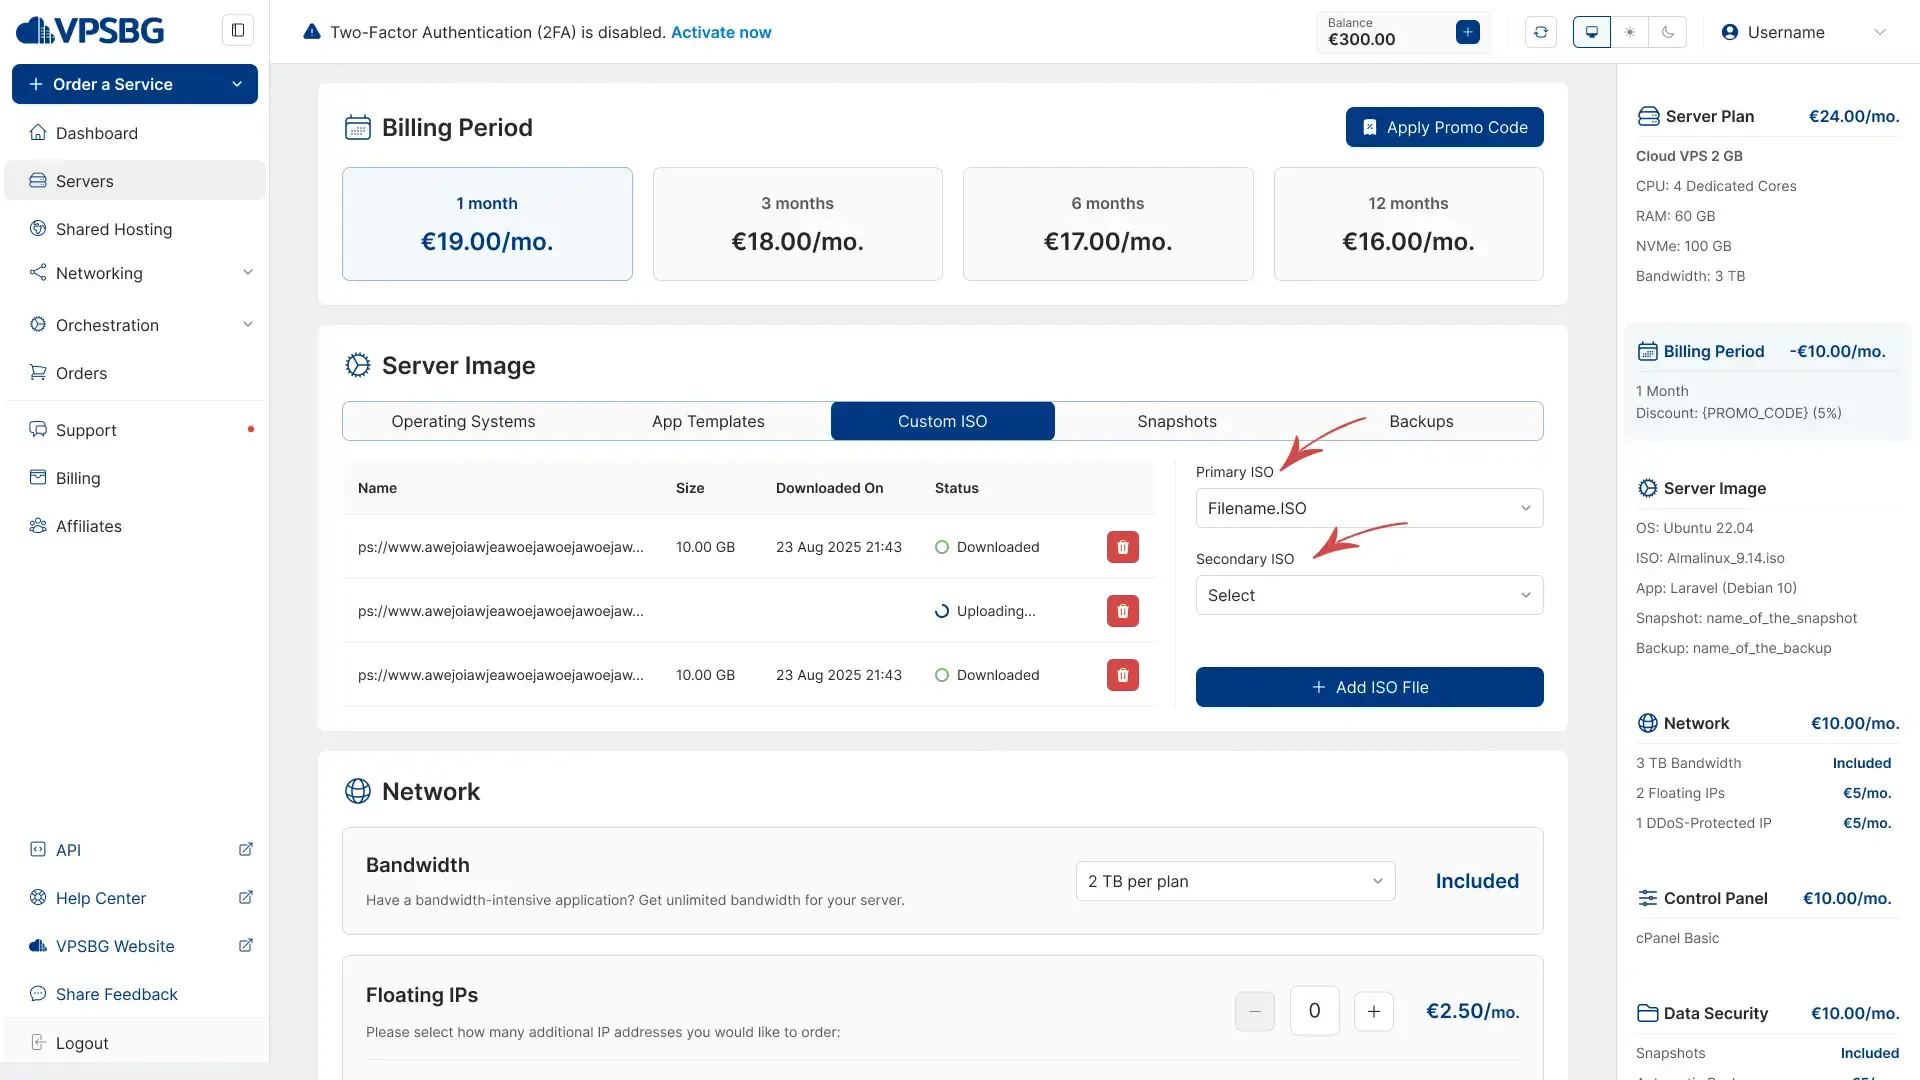
mounting options

That’s it! Simply complete your order and your server with a custom ISO will be deployed.

Afterwards, you will be able to see your custom ISO files by going to the Orchestration tab from the menu on the left and selecting ISO Files.
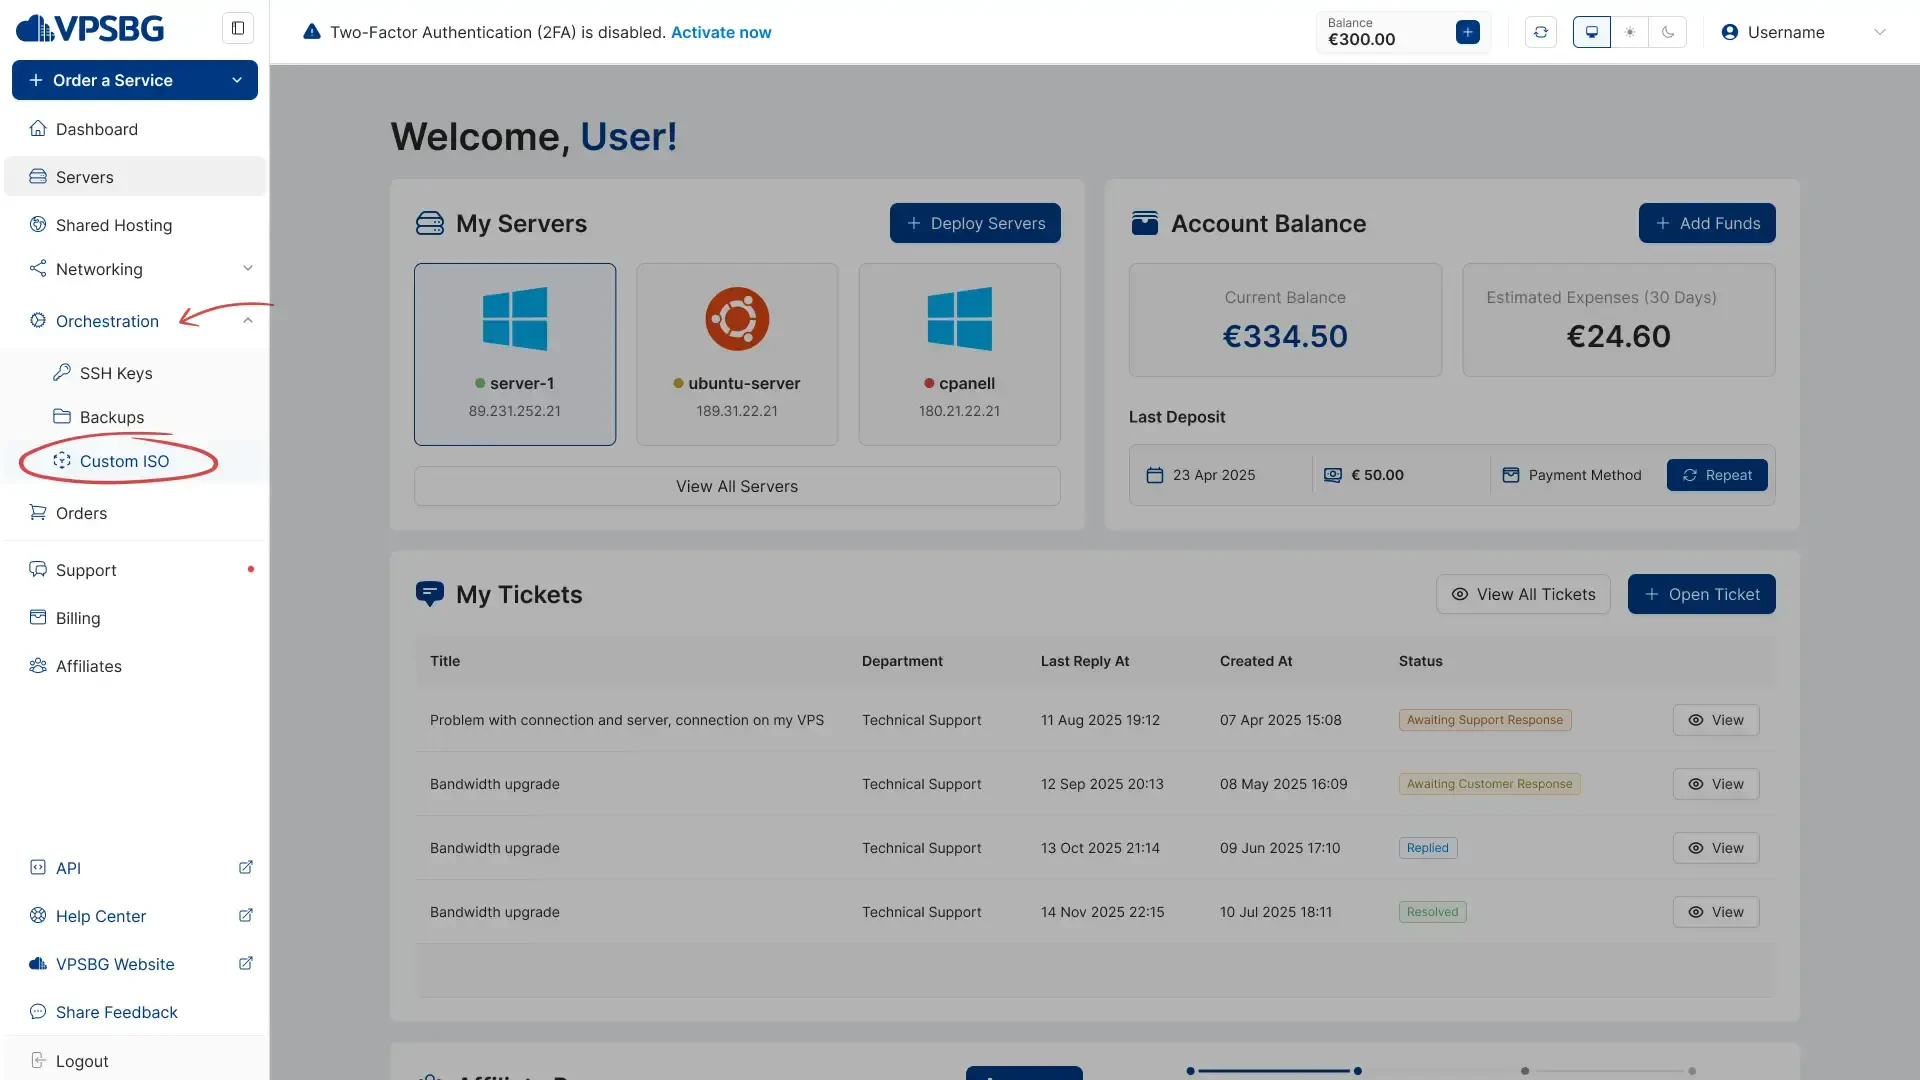
custom iso tab

This is the custom ISO management page, allowing you to add new, remove current and redownload old custom ISO files which you can then use to mount on your servers.
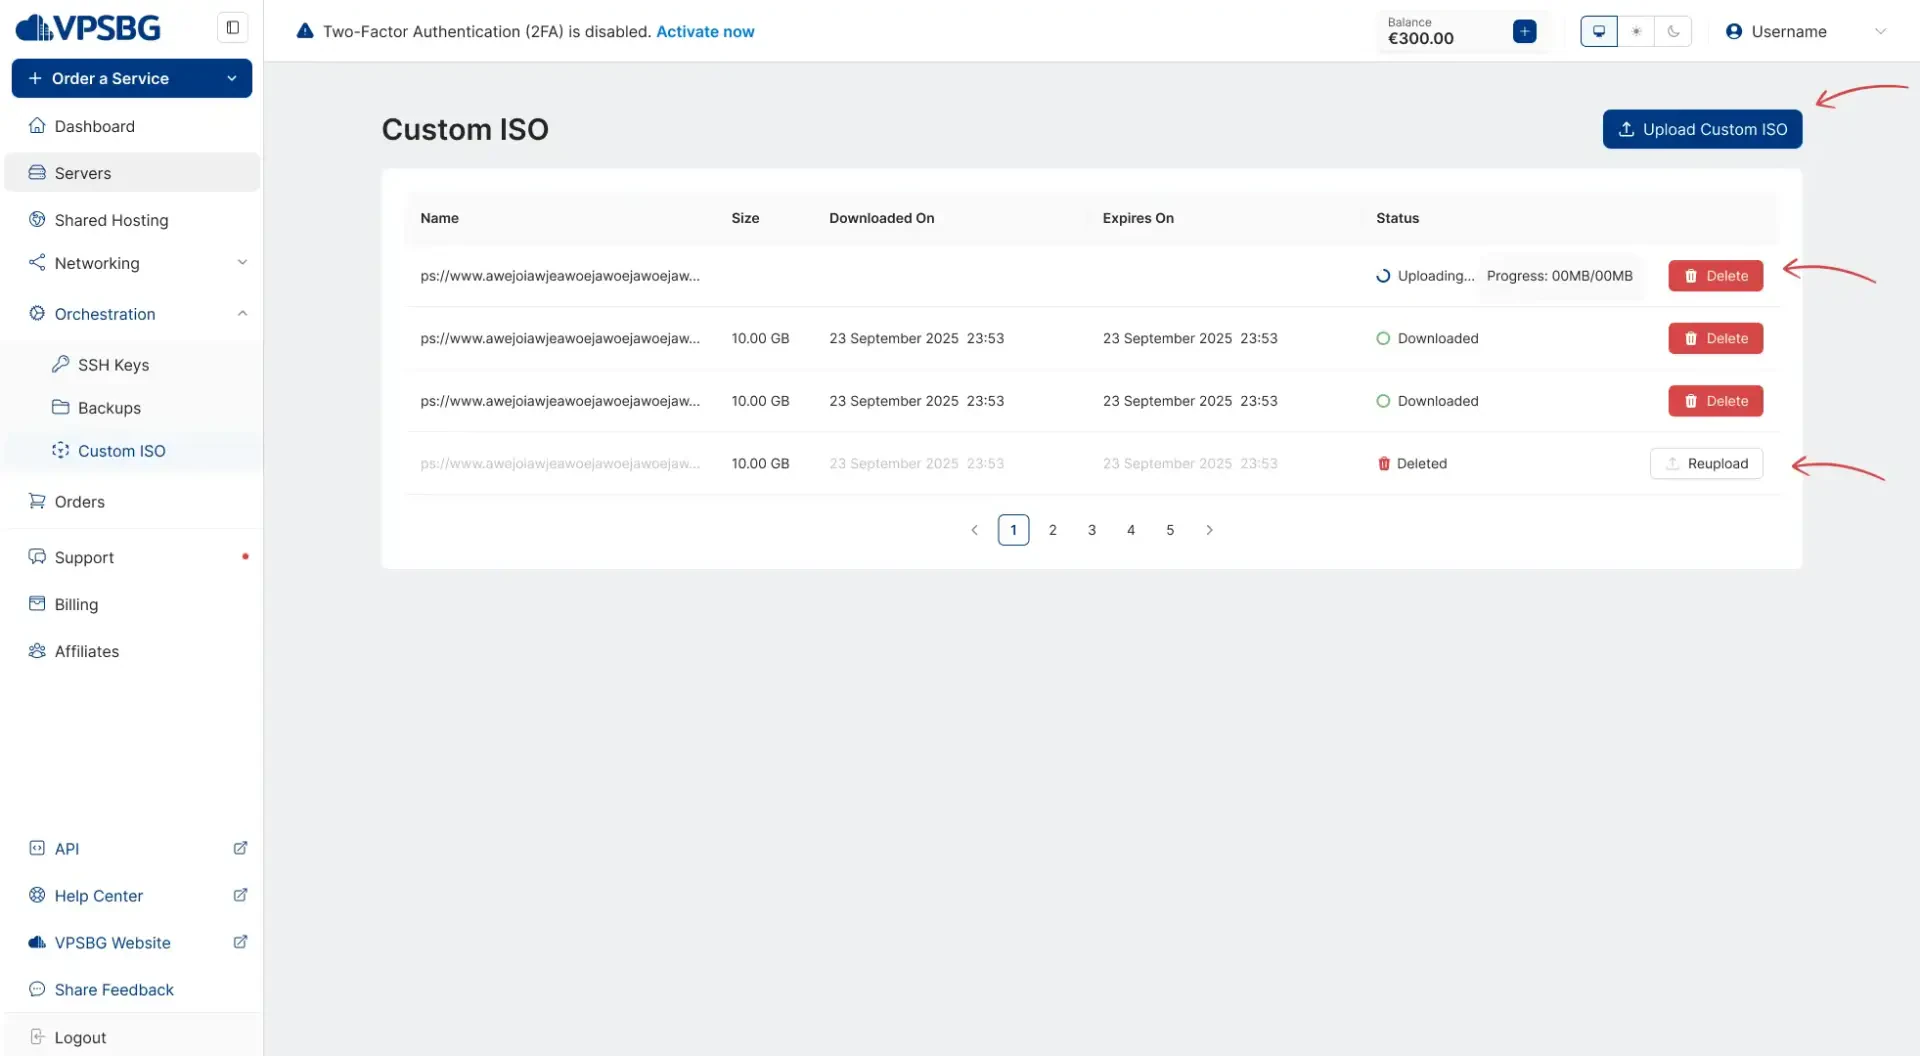
custom iso actions

IMPORTANT: Custom ISO files can only be mounted and dismounted from the server management page. You can only have 2 active custom ISO files in your account at any time! Each ISO is kept for 48 hours after it has been downloaded. The maximum size for an ISO is 10GB and it needs to have a correct file extension.

How to upload a custom ISO to my server

The process is exactly the same as with the configurator. Start by logging into our Console. From there, click on the “Servers” tab from the menu. Next, select the server for which you want to upload your custom ISO and click on “Manage”.
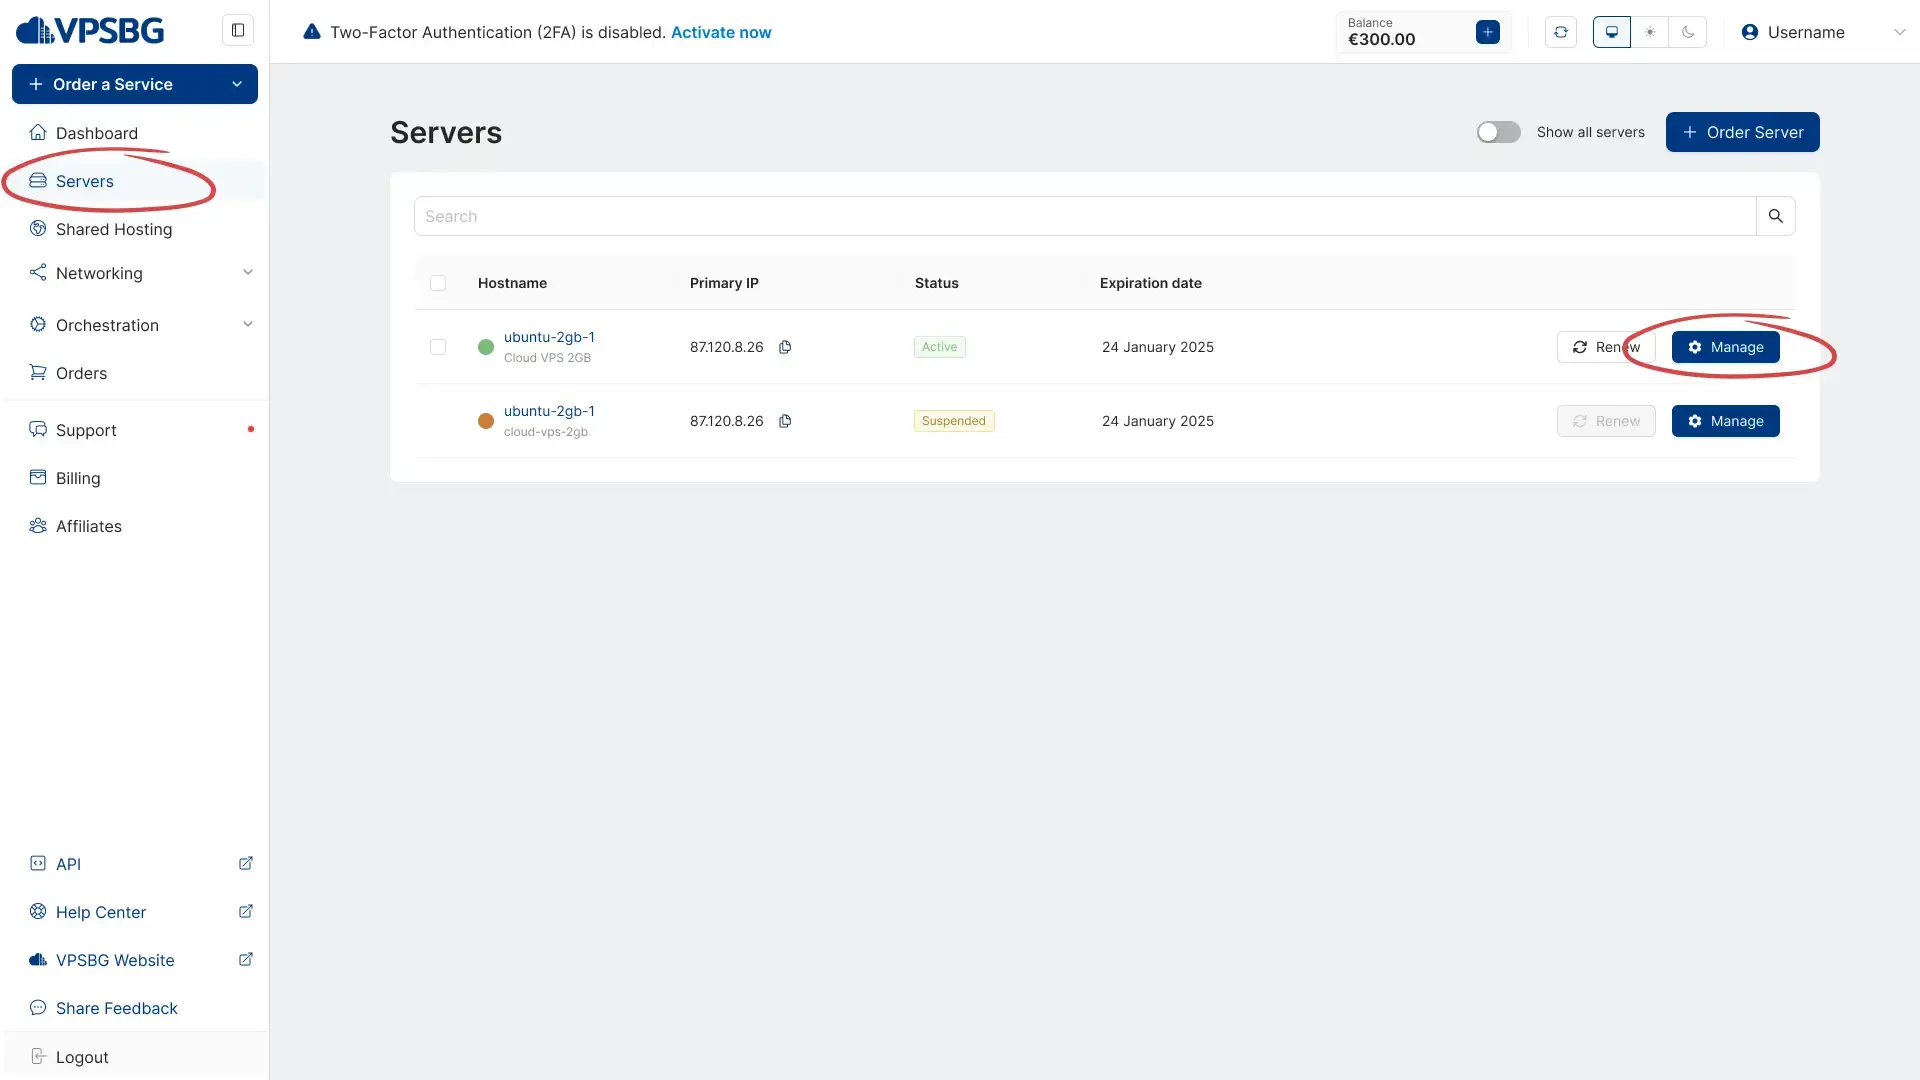
manage server

This will open up the server management page. Now, click on the “Settings” tab.
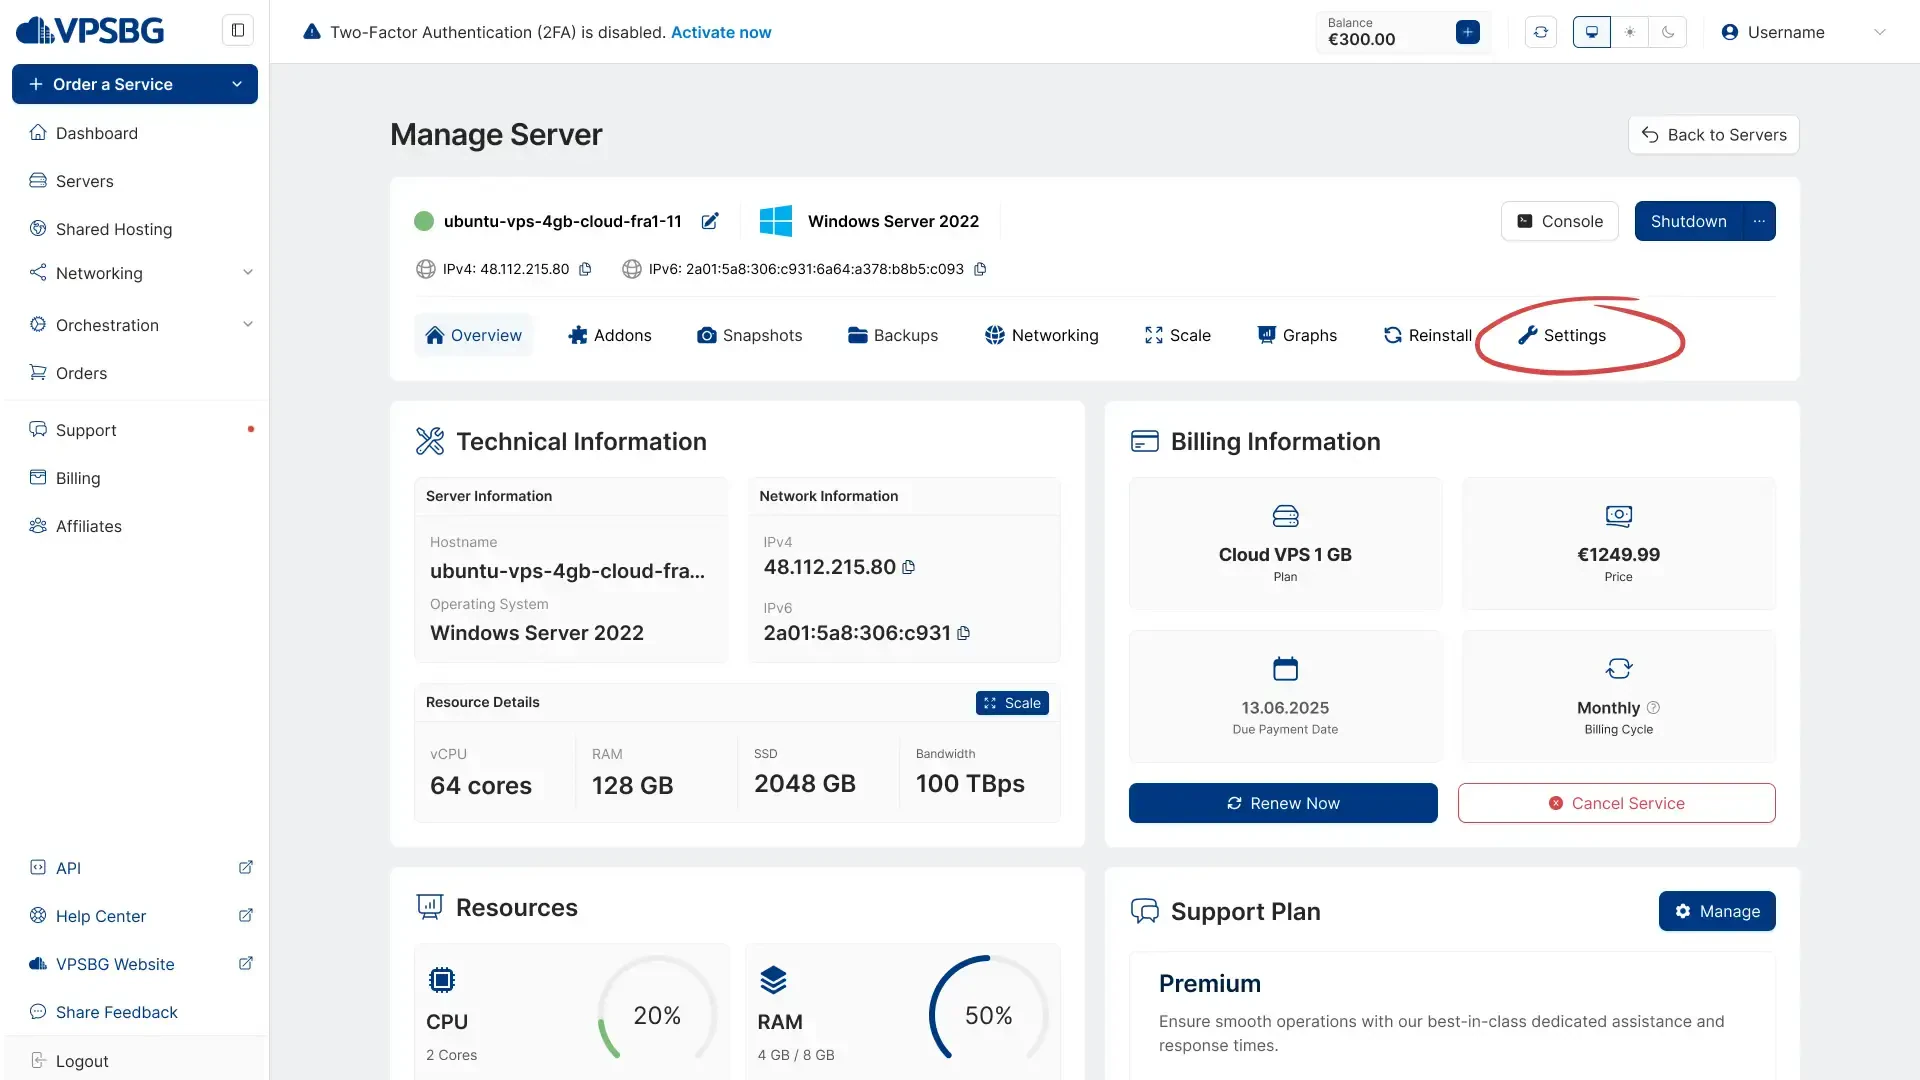
settings

You will now see the ISO Files section. Here, click on the “Add ISO File” button, paste your Custom ISO download link and click on the “Donwload” button.
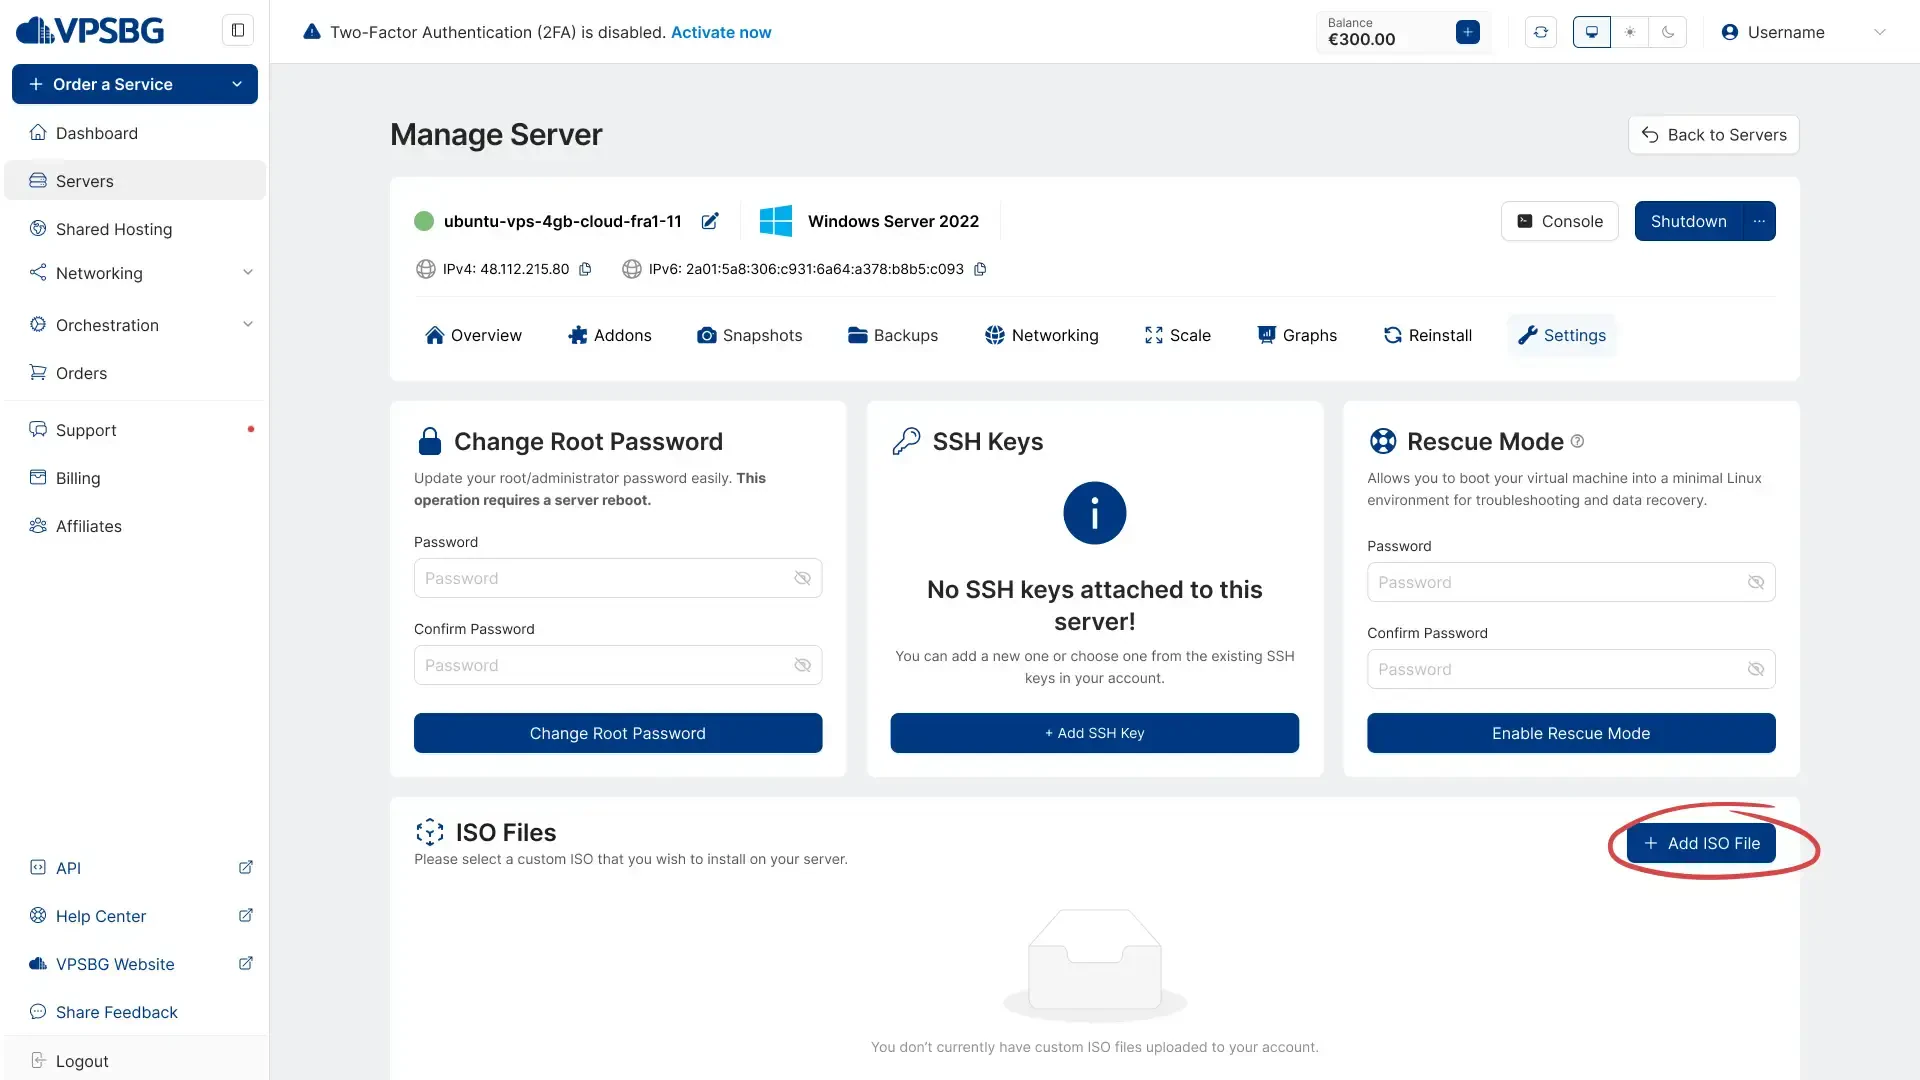
settings iso

Once the download finishes, you will see your Custom ISO listed, allowing you to mount it onto your server.
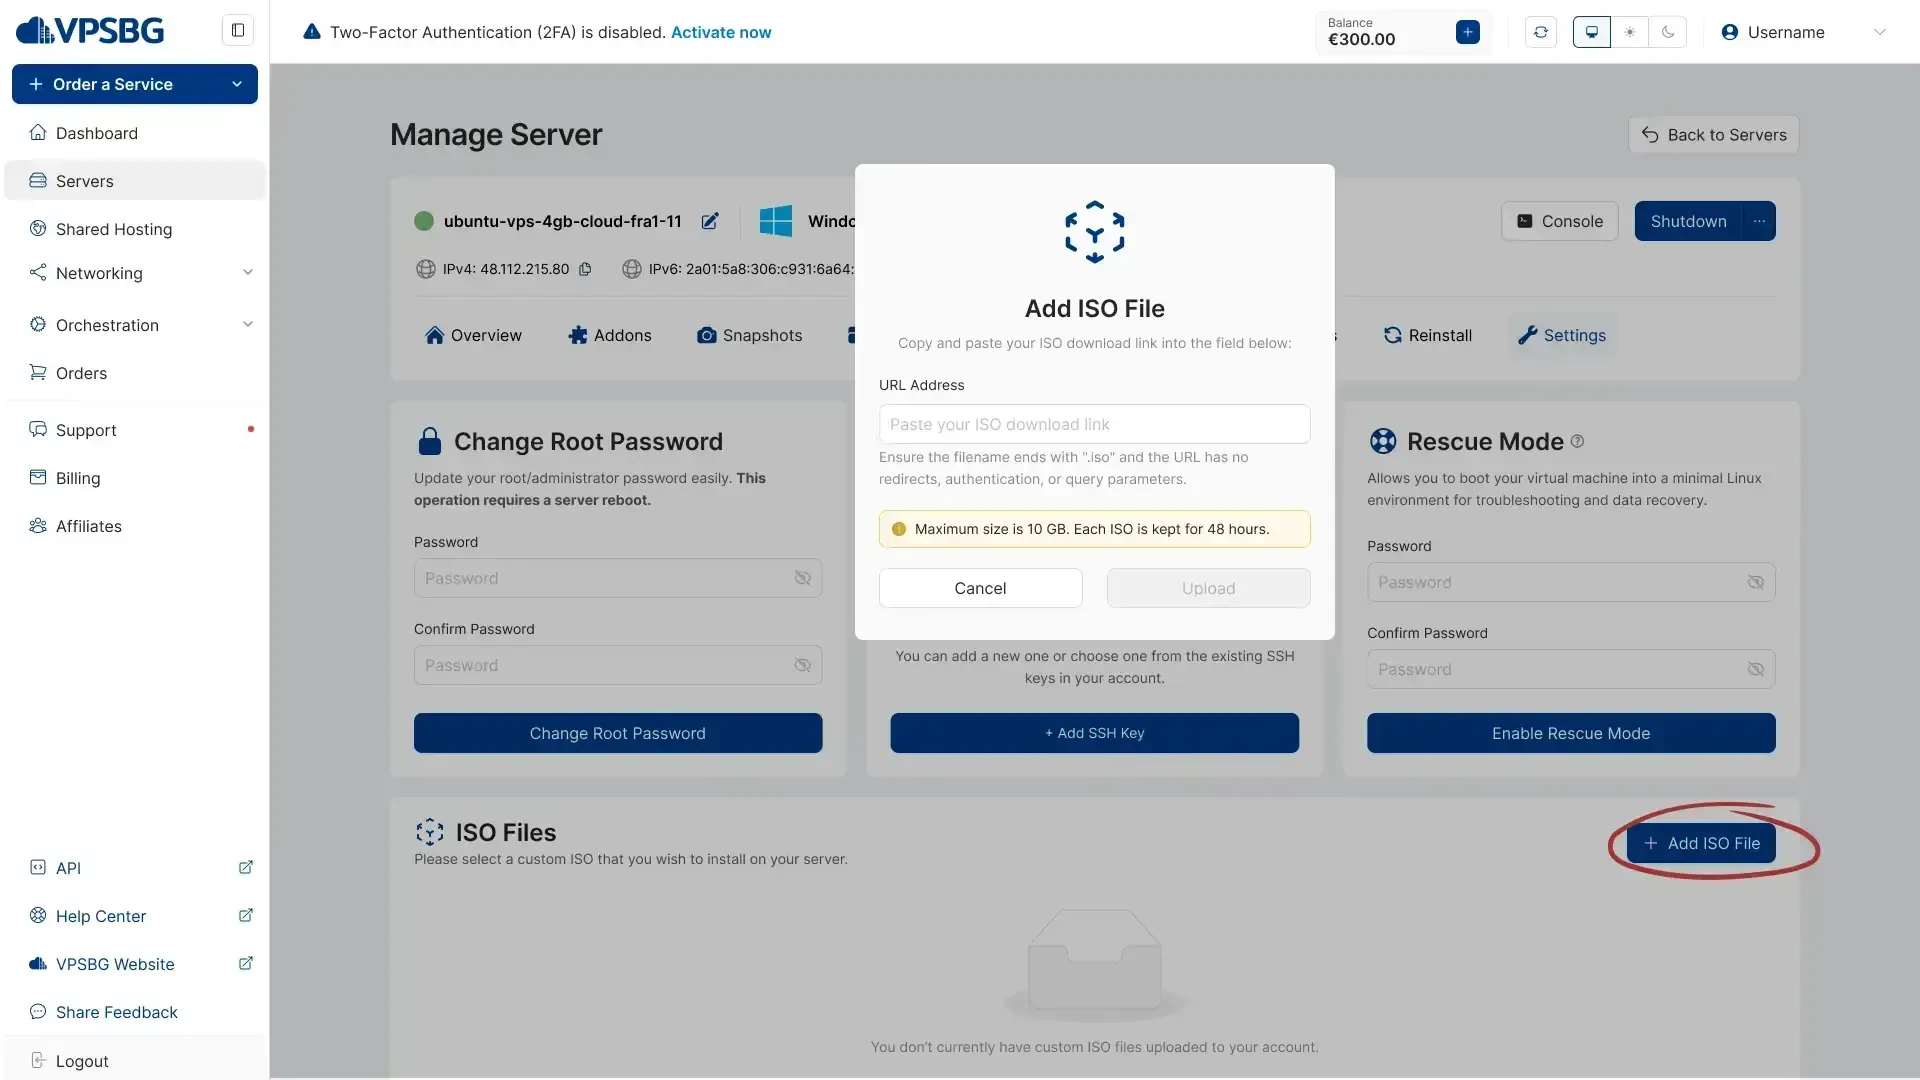
add iso files

IMPORTANT: You can upload a maximum of 2 custom ISO files. Each custom ISO you upload has a max size limit of 2GB and is only kept for 2 days if not utilized.

If you upload multiple ISO files, you will have the option to mount one of them as a Primary ISO and the other as a Secondary ISO.

That’s it! You now have a cloud server with your own custom ISO.

Subscribe to Our Newsletter

Join 5000+ subscribers and receive helpful content, deals and more! We promise no spam - 100% great content. Unsubscribe anytime.

Share Article

Related Content

15 January 2023

How to set up Laravel Forge on your VPS server

Learn how to install Laravel Forge on your VPS or VDS and start managing your Linux server. Deploy PHP applications and databases with ease.

#Tutorial#Laravel
01 April 2025

How to perform AMD SEV-SNP attestation inside a guest virtual machine

In this tutorial, we are going to show you how to perform AMD SEV-SNP attestation inside a guest virtual machine to verify trust and security.

#Tutorial#SEV
19 July 2023

How to install Windows on a cloud server

In this tutorial, we are going to show you how to install Windows OS on your cloud server from an ISO file with Windows Server 2022 & VirtuIO drivers.

#Tutorial#Windows

Unrivaled Performance & Security

Deploy a powerful and reliable Cloud VPS today to ensure your privacy. SEV-SNP included for maximum protection.

Configure VPSContact Us