How to create and manage a VPC
Published: 28 April 2026 • 7 min read
A VPC (Virtual Private Cloud) is a logically isolated network where resources can run in a private environment, without access to the public Internet. Different services and applications in the network utilize private IPs for communication instead of having to utilize publicly accessible IPs, improving security and overall privacy.
We designed our VPC feature to give you the benefits of private networking without having to deal with the complexity that comes with setting it up or managing it.
How to create a VPC
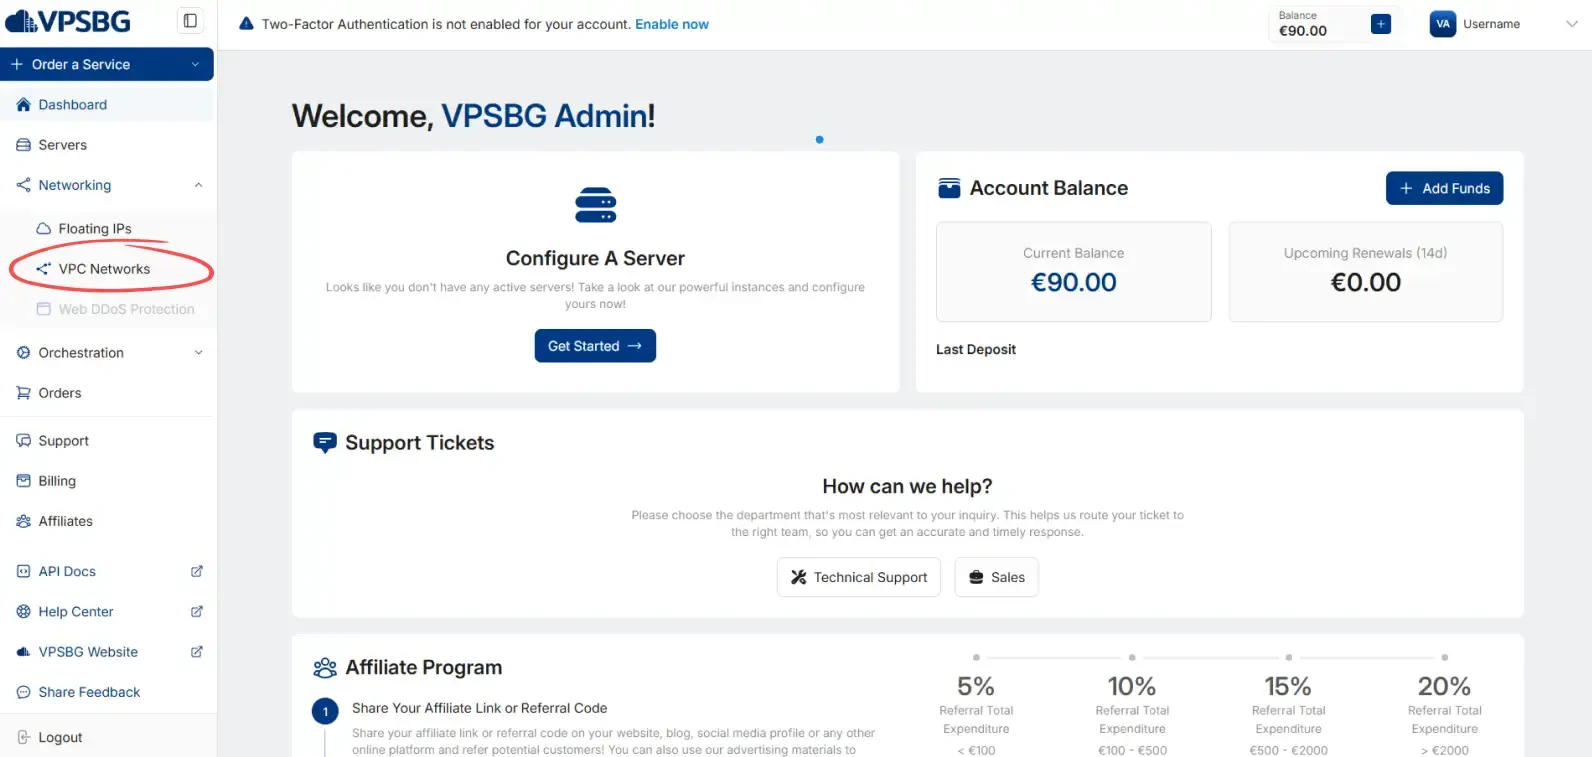
The entire process has been simplified dramatically with the help of the VPSBG Console. To create a VPC network simply navigate to the Networking tab and click on the VPC Networks button.
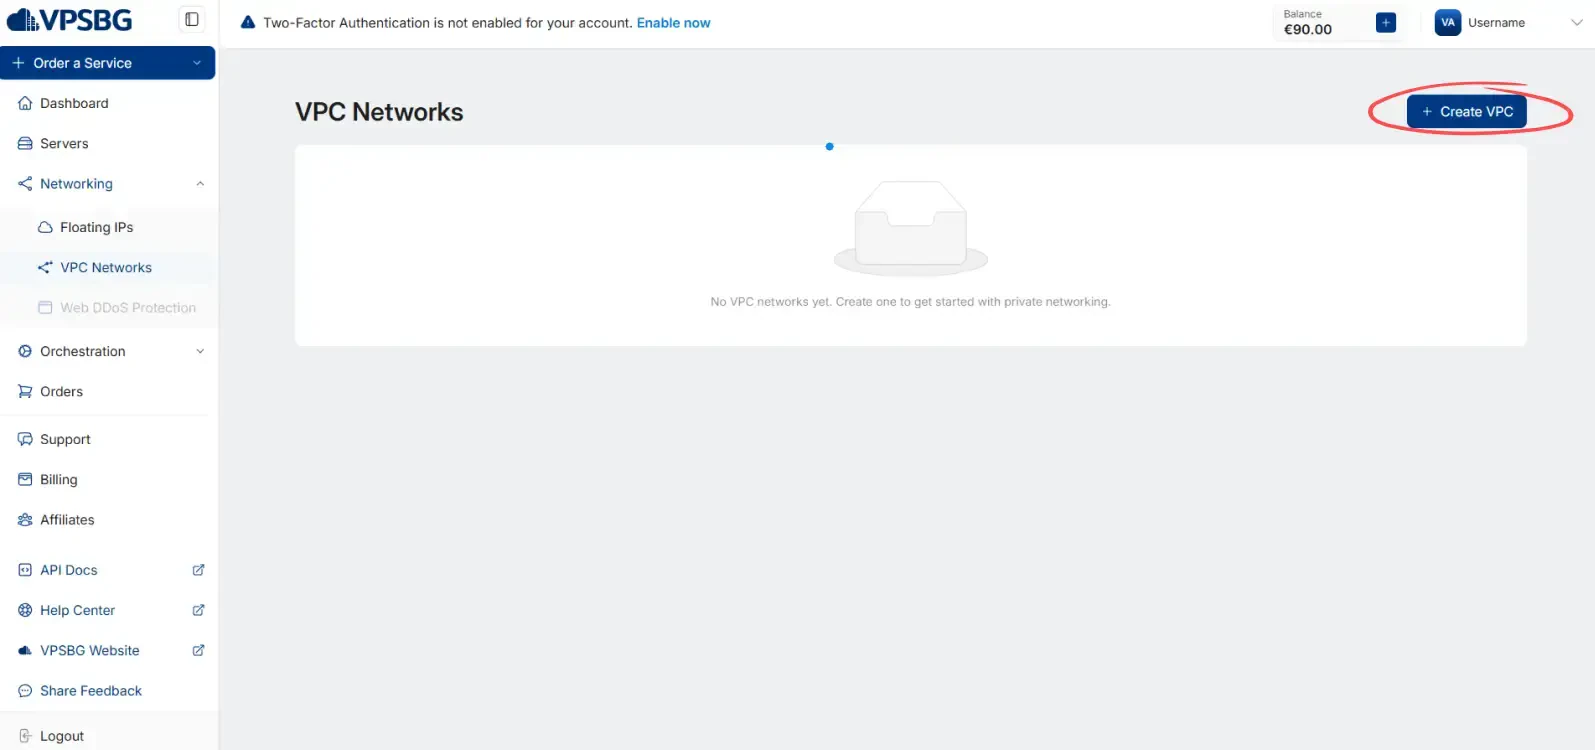
Next, click on the Create VPC button in the top right:
You will now be presented with the following modal:
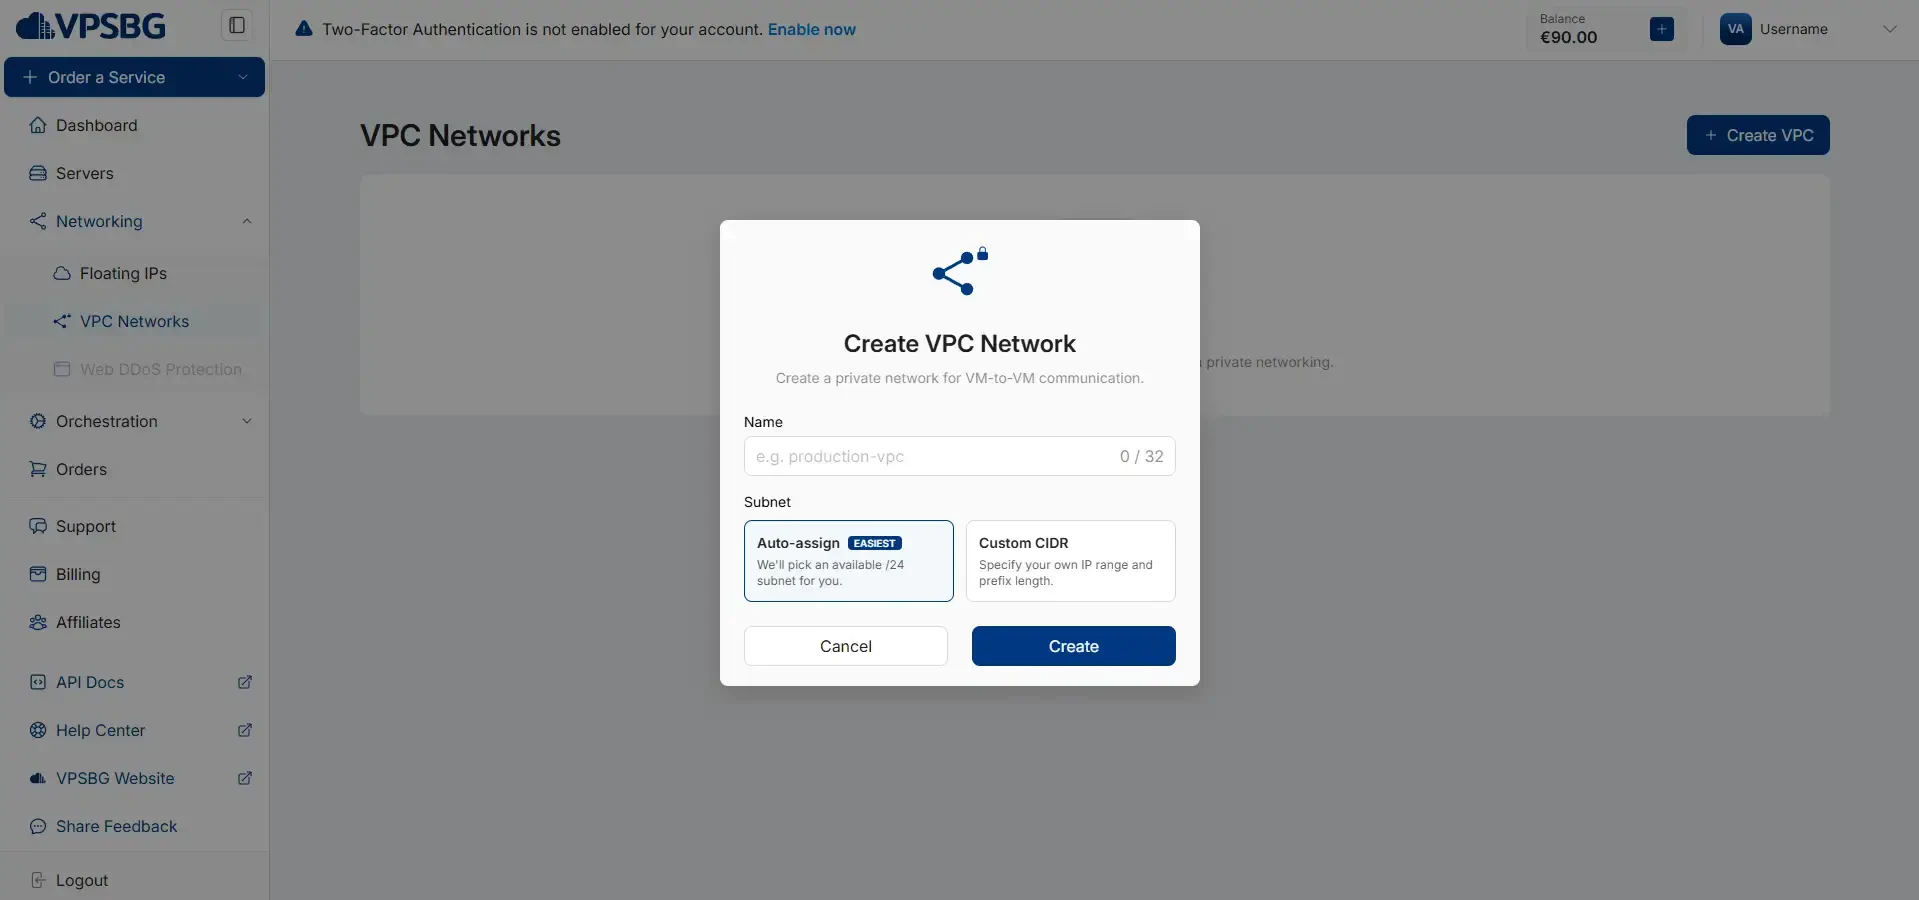
Here, you will need to give your VPC a name and you will also need to select a subnet. The first option will automatically assign an available /24 subnet to your VPC, whereas the second option - Custom CIDR will allow you to manually enter an IP range and subnet for greater versatility.
Alternatively, you can also create a VPC directly through the server configurator or from the Networking tab in your server’s management page:
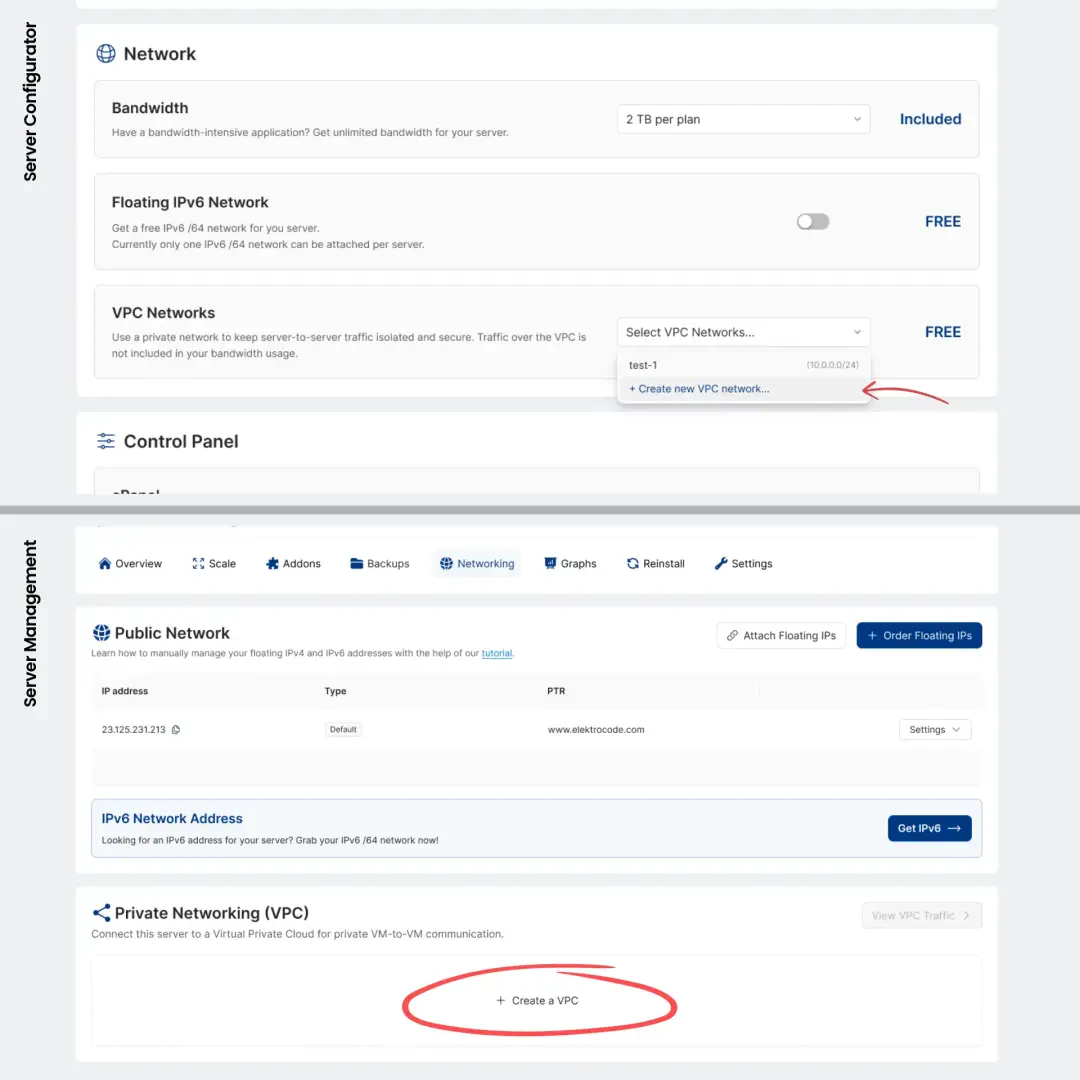
IMPORTANT: Each server can only be attached to 2 VPC interfaces at once. You can also create a maximum of 5 VPC interfaces on your account. If you wish to extend your limits, please contact us.
How to manage VPC IPs on Linux
If your server is running on Linux and you have selected the manual configuration option, here’s how to set things up.
Before you begin, make sure you know:
- the private IP address assigned to this server inside the VPC, e.g., “10.64.0.2”
- the VPC subnet mask or CIDR, e.g., “/24”
Start by navigating to the Networking tab in your server’s management page. Next, check the Private Network (VPC) details. There you can see the assigned private IP address, the interface name and the MAC address for each attached VPC interface.
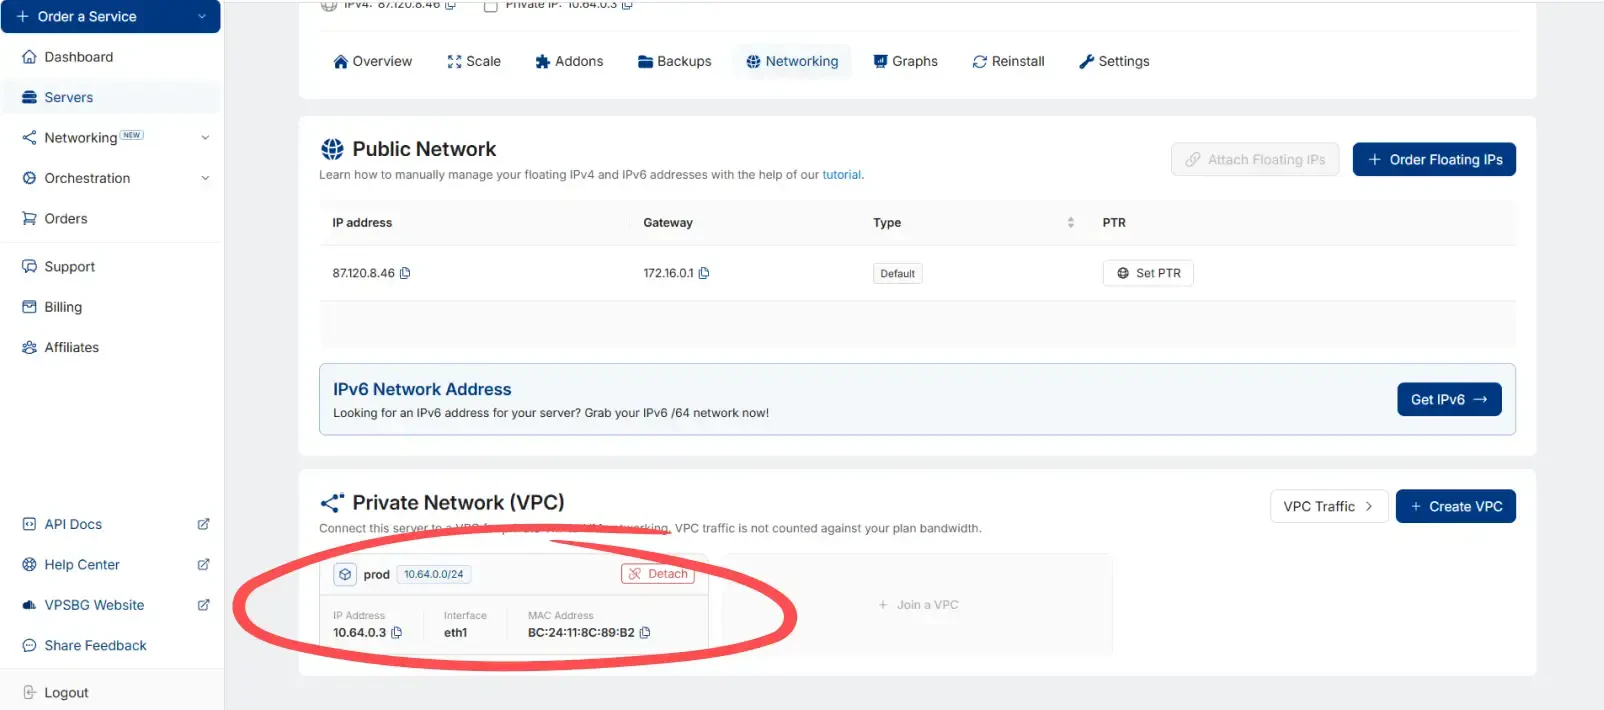
Use the MAC address as the primary way to identify the correct VPC interface inside the server.
In the examples below, we will use “10.64.0.2/24”, which is a typical first private IP assignment from the default VPC range when “Auto-assign” is selected when attaching the VPC to a server. Replace it with the private IP address assigned to your server inside the VPC as shown in the Console.
How to manage VPC IPs on Ubuntu and Debian
Firstly, you will need to identify the additional network interface that was added for the VPC:
ip -br linkMatch the MAC address shown in the Private Network (VPC) tab in the Console to the correct interface shown by this command. If your interface has a different name than the one shown in the examples below, substitute it in the commands. Next, you should also check if Netplan is present:
ls /etc/netplanIf files are listed, you can proceed to following the next steps.
Netplan configuration
Create a dedicated Netplan file for the VPC interface:
install -m 600 /dev/stdin /etc/netplan/60-vpc.yaml <<'EOF'
network:
  version: 2
  ethernets:
    enp6s19:
      dhcp4: false
      dhcp6: false
      addresses:
        - 10.64.0.2/24
EOF
IMPORTANT: Before pasting the command, replace:
- enp6s19 with your VPC interface name
- 10.64.0.2/24 with the private VPC IP assigned to your server
If you previously added the VPC IP using this method, edit the existing file instead of creating a new one. To remove the VPC IP configuration, simply delete "/etc/netplan/60-vpc.yaml".
Next, apply the configuration:
netplan applyFinally, verify that the IP is present:
ip -br addr show enp6s19You should see the private VPC IP address on the selected interface. This configuration is persistent and will survive reboot.
If you attach a second VPC to the same server, repeat the same process for the additional VPC and create a separate Netplan definition for that interface.
How to manage VPC IPs on AlmaLinux, Rocky Linux and Fedora
First, identify the additional VPC network interface:
ip -br linkThen, find the NetworkManager connection profile attached to that interface:
nmcli -f NAME,DEVICE,TYPE connection showLook for the profile whose DEVICE matches the VPC interface. The connection name is often Wired connection 1, but it may differ on your server.
In the commands below, first replace:
- “Wired connection 1” with the correct connection name
- “ens19” or “eth1” with your actual VPC interface if you use it in verification commands
- “10.64.0.2/24” with the private VPC IP assigned to your server
Add the VPC IP to the VPC connection profile:
nmcli connection modify "Wired connection 1" \
  connection.autoconnect yes \
  ipv4.method manual \
  ipv4.addresses 10.64.0.2/24
Then apply the changes:
nmcli connection up "Wired connection 1"To verify that the IP is present:
ip -br addr show ens19You should see the private VPC IP address on the selected interface. This configuration is persistent and will survive reboot.
If you attach a second VPC to the same server, repeat the same process for the additional VPC and assign the second VPC IP to that interface's NetworkManager connection profile.
How to manage VPC IPs on Windows
If your server is running on Windows, here’s how to manually configure your VPC settings.
Similarly to Linux, before you begin, make sure you know:
- the private IP address assigned to this server inside the VPC, e.g., “10.64.0.2”
- the VPC subnet mask or CIDR, e.g., “/24”
Start by navigating to the Networking tab in your server’s management page. Next, check the Private Network (VPC) details. There you can see the assigned private IP address, the interface name and the MAC address for each attached VPC interface.
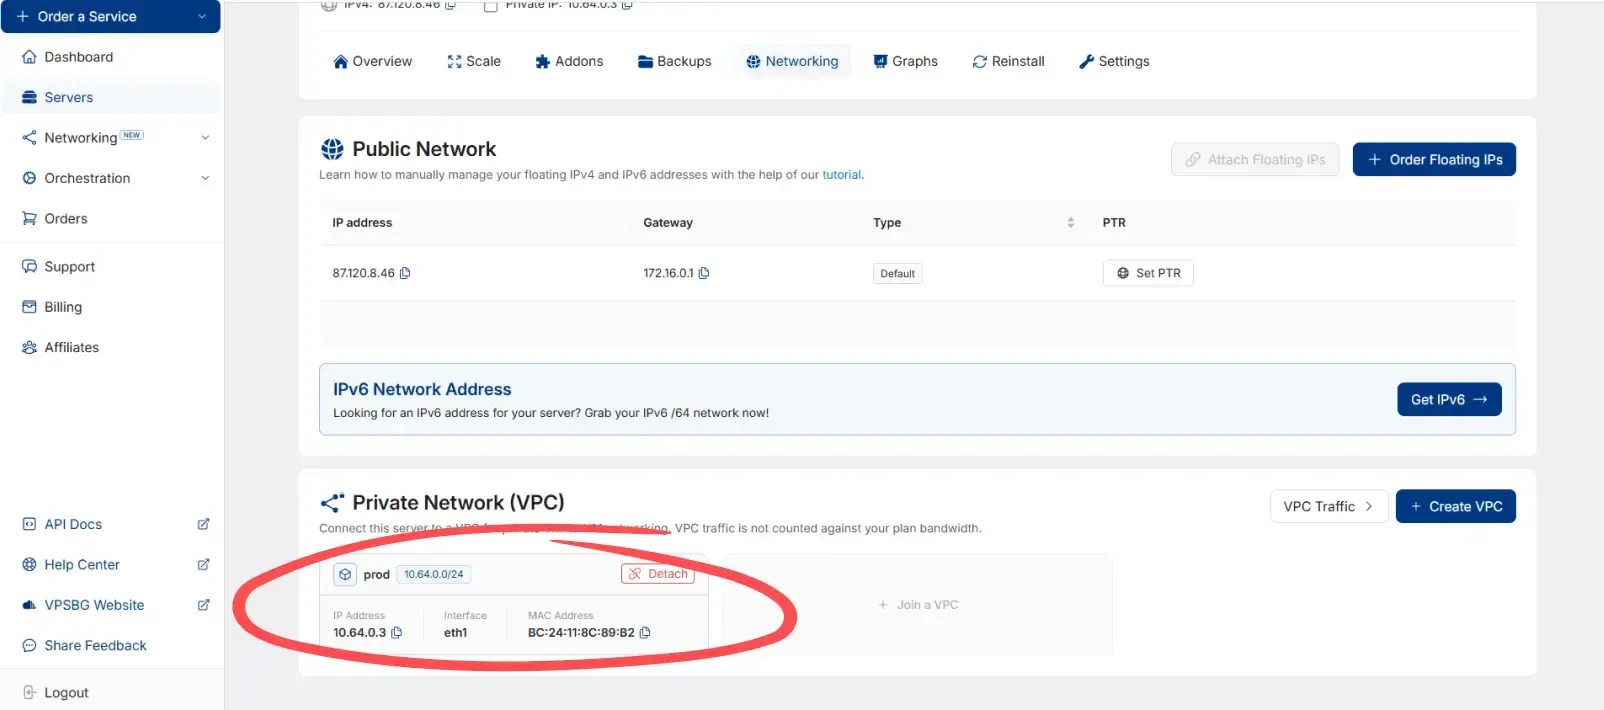
Use the MAC address as the primary way to identify the correct VPC interface inside Windows.
In the examples below, we use “10.64.0.2” with subnet mask “255.255.255.0”, which is a typical first private IP assignment from the default VPC range when “Auto-assign” is selected when attaching the VPC to a server. Replace it with the private IP address assigned to your server inside the VPC as it can be seen in the Console.
Identify the VPC Network Adapter
Firstly, start by typing “control panel” in Windows search. Then, click on the Control Panel option and select Network and Internet as illustrated below:
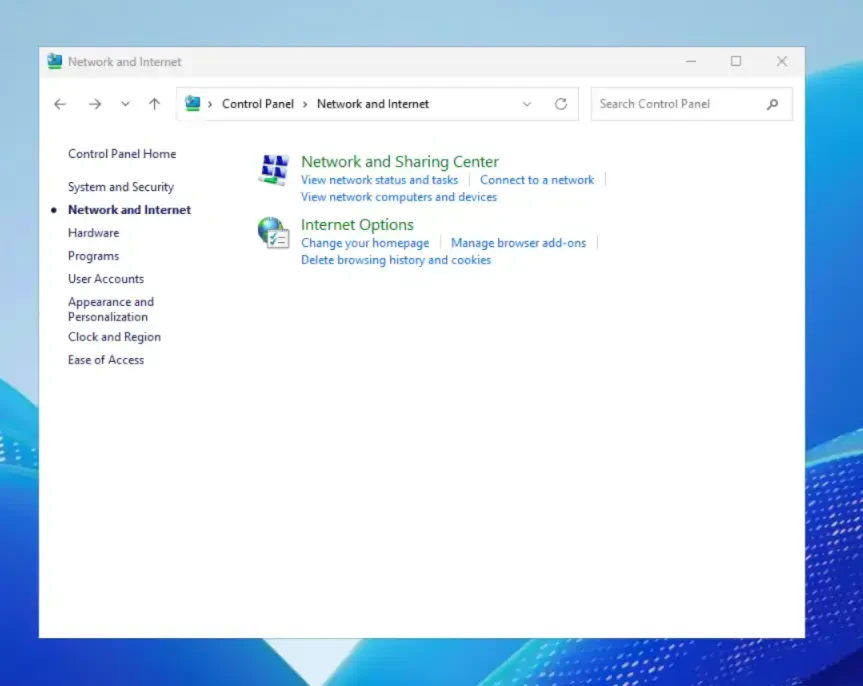
Afterwards, click on Network and Sharing Center. Once there, click on the Change adapter settings option, which will be located in the menu on the left side. You should now see your network adapters:
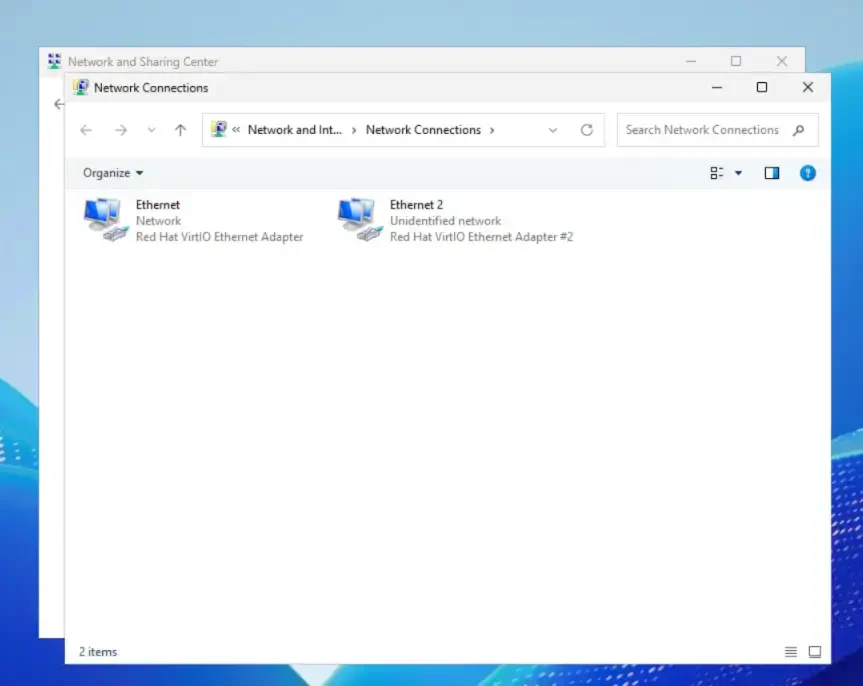
To identify the correct VPC adapter, right-click each adapter and open Status, then click Details. Usually, the VPC adapter will appear as Ethernet 2, while Ethernet will hold the public IP address. If this is not the case, you should compare the MAC address shown there with the MAC address shown in the Private Network (VPC) tab in the Console. Once you find the correct adapter, continue with the steps below.
How to configure the VPC IP address
Right-click the correct adapter and select Properties. Then go to the Internet Protocol Version 4 (TCP/IPv4) option and, again, click on the Properties button. Once the Properties window opens up, select Use the following IP address, then fill in:
- IP address: your private VPC IP address, for example “10.64.0.2”
- Subnet mask: the subnet mask that matches your VPC CIDR, in this case “/24” matches “255.255.255.0”
- Leave Default gateway empty
You can also leave the DNS server fields empty for the VPC adapter.
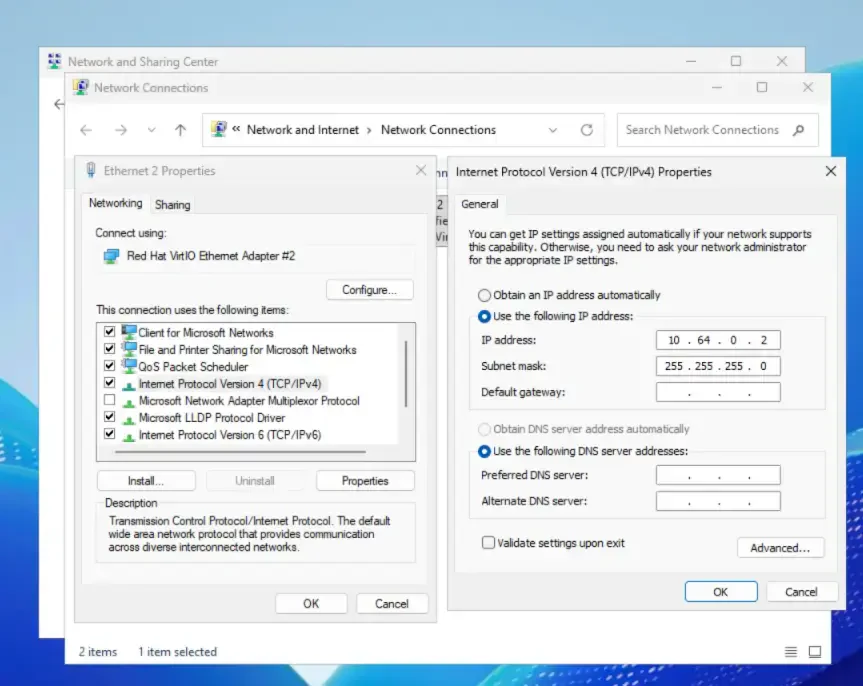
When you are ready, click OK and then close the remaining windows.
How to verify the configuration
Afterwards, you can verify the configuration. Open Command Prompt and run:
ipconfigYou should see the private VPC IP address assigned to the adapter you configured.
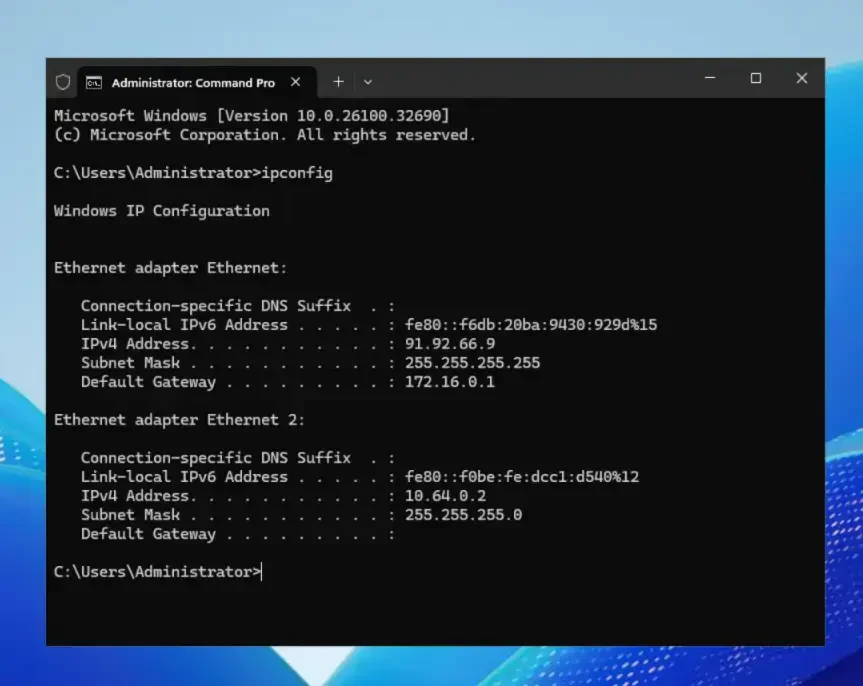
This configuration is persistent and should survive reboot.
How to remove the VPC IP Address
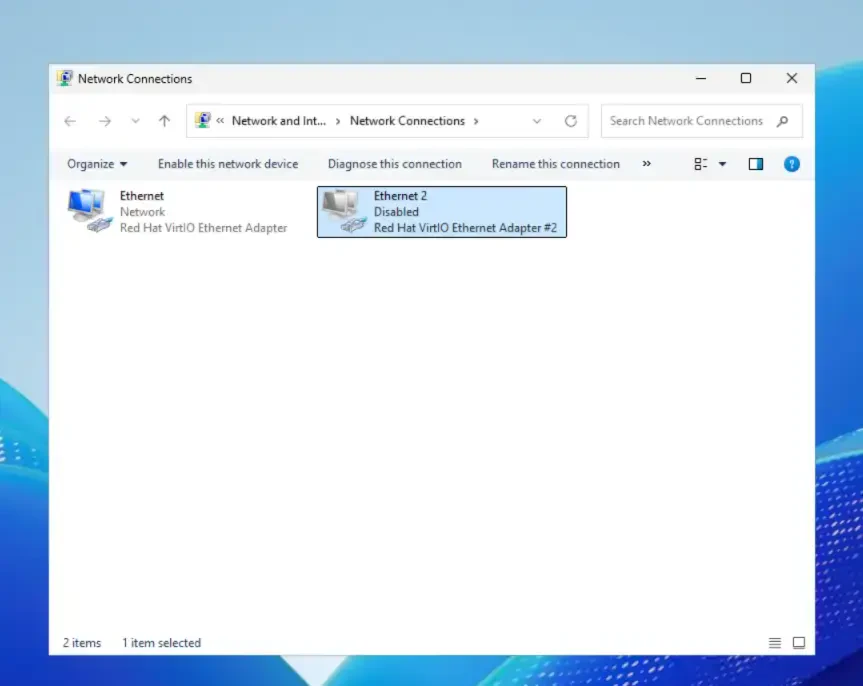
If you want to remove the private VPC IP, open the same adapter again: Control Panel > Network and Internet > Network and Sharing Center > Change adapter settings.
Then right-click the VPC adapter and choose Disable. This will fully disable the interface.
If you want to attach a second VPC to the same server, simply repeat the same process for the additional VPC adapter based on your operating system. Just make sure you assign the private IP address that belongs to that VPC and you use the correct subnet mask for that VPC.
If you encounter any issues regarding our VPC feature, do not hesitate to contact us.